Prev |
Next
To get started, let's open the Maya scene, caustic_dragon.ma.
(Where are the tutorial files?)
RenderMan for Maya uses a classic two-pronged approach to rendering caustics,
utilizing “shading models” and photon maps to create the effect.
Caustics can be created using Maya materials or RenderMan shaders with
equal ease and just a couple of “tricks”.
First, let's render the Maya scene as is.
Render-> Render Current Frame
You'll get an image like the one below:
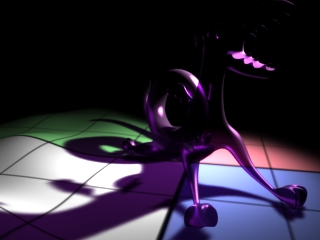
Direct lighting, with transparent Deep Shadows.
The aforementioned two-pronged approach boils down to two things: surfaces
and lights. The “shading model” is an attribute that you attach to
your surfaces and the photon map is generated, using a special pass, from
attributes added to your light.
As you can see from our scene, with the good ol' reliable dragon sitting on
our oogly grid-plane-thing, we have two types of surfaces: one translucent
surface filtering light to create the caustics and another opaque (and matte)
surface that caustics are cast upon. We need to add RenderMan attributes to
each to let the renderer know how to treat each during the caustics pass.
- Select the Dragonberry material attached to our dragon (it's a
Phong E, but a Blinn would do just as well) using your method of choice.
From the Attributes menu in the Attribute Editor, select
RenderMan -> Add Caustic Controls. In the Extra RenderMan
Attributes section that is added there is now a drop-down list of
Shading Models to choose from (note that it appears after the Refraction
attributes that we added surreptitiously…); for our purposes, the
“Glass” Shading Model will work best.
- Select the Gridbert material and add the caustic controls to
that as well. In this case, you want to select the “Matte”
Shading Model.
- Now select the Key light. Before we add the appropriate
attributes, note that we've already added RenderMan Shadow Attributes.
Deep Shadows are not required for caustics, but they sure are nice. We'd be
remiss if we did not point out that our Key light's falloff is set to
Quadratic. This is not negotiable — you simple must
do this…please. Because of the change in the falloff, we needed to
compensate a bit by increasing the light's intensity. This light is, like,
totally intense.
So…with that out of the way, go ahead and select RenderMan -> Add Caustic
Attrs from the Attributes menu. They'll look a little something like
this:
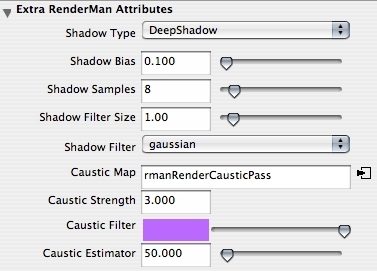
The first thing you'll notice is that there's a Caustic Map
parameter, and an rmanRenderCausticPass has been created. There
are also parameters controlling the strength and coloring of the caustics,
and a parameter (Caustic Estimator) that controls how many photons
are “consulted” in the caustics calculations.
For our purposes, to make our a smidgen more overt and to pretty
things up a bit, let's bump the Caustic Strength up to 3-ish, make our
filter a lovely shade of lavender, and lower the Caustic Estimator to 50.
- Now let's take a look at that pass we've created. Click on the widget
next to the Caustic Map parameter to navigate to the pass tab (or you can
access it from the Passes tab in the Render Settings). You've
got your usual pass settings, for cameras, objects, lights, and caching,
plust you have some caustic-specific settings. For now, the important ones
are the Emit setting, which dictates the actual number of virtual
photons to emit, and the Shading Rate. We want to bump the number of
photons up to 500,000, and we'll leave the Shading Rate alone for now, but
we want to remember it's there, for future reference.
- That seems like a lot of stuff to do, but it went pretty smoothly, right?
Okay then, let's render…
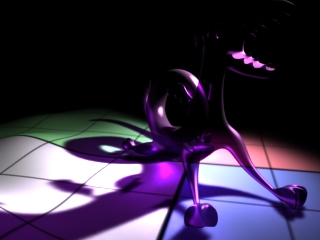
Voilà! A wee smudge of a bright spot in the middle of our
shadow. Um…let's see if we can't spruce that up…go back to the
caustic pass and spike the photons setting, then lower the shading rate.
It will take a wee bit longer to render, but the results are nice —
a bit more definition to the caustics and some nice spread, plus additional
caustics under the front feet…

You can get the same results with a RenderMan Shader using essentially the
same workflow. RenderMan Studio users can build their appearance in Slim,
add it to their scene, and then add the necessary attributes via the
Attribute Editor, or anyone can create a RenderMan Shader node, reference
an appropriate .slo file, and proceed as above. The image below is using a
funky little Delux appearance created with Slim 7.0.
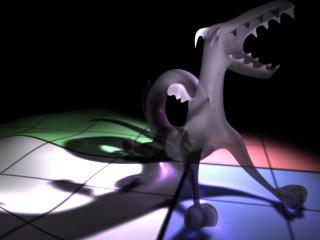
Caustics with a RenderMan Shader
Although there are a few important things to remember, creating caustic
effects is an essentially simple process. After you're comfortable with
the simple scene we've set up here, run through things again with a
different caustic shading model, like Chrome. The workflow is the
same, but you get the funky caustics of sunlight bouncing off your
bling-bling.
Prev |
Next
|
Pixar Animation Studios
Copyright©
Pixar. All rights reserved.
Pixar® and RenderMan® are registered trademarks of Pixar.
All other trademarks are the properties of their respective holders. |