Combining Tcl with IceMan Scripting |
In the previous examples we wrote the entire script in tcl and, as necessary, built one-line IceMan scripts to perform imaging operations. In this tutorial we'll get a little more complex and show how to write IceMan extensions, highlighting where you would choose one environment over the other.
The goal is create a command called bracket that would take a high dynamic range image (HDRI) and create a series of images that would represent mapping that HDRI at a variety of exposure values. Instead of outputting a new image for each exposure level, we are going to create a montage image containing all the results.
We're going to use the crop window, which the user drags out in the GUI. The crop window is only available at the tcl level. We're also going to be iterating over an image and shuffling about the results and creating a montage, something IceMan scripts excel at. We'll try to keep the bits that each environment does well in the right place.
As with the introductory tutorial, you don't need a Maya scene file for this. All you need is an image to run the script on. An HDRI image will show off the particular utility of this script, but modifying the example to perform any other image processing operation should be easy.
|
1 — ADDING AN EXTENSION |
First, let's set up the new extension script files. In this example we'll be adding both a “tcl” extension and an “io” one. See the previous example on how to set up a local user it.ini file. This time, add two new lines to it.ini, one for each script file we'll be working on.
  LoadExtension tcl /path/to/your/scripts/bracket.tcl
  LoadExtension io /path/to/your/scripts/bracket.io
Change the path according to where you actually put your scripts.
|
2 — THE TCL PART |
Now we'll concentrate on the tcl part. This will retrieve the current crop window from the GUI and process any arguments. We use a standard extension — ice::getopt — to pull out any optional arguments. Tcl routines can have a variable number of arguments if their last formal argument is called args. We adopt a convention of always having arguments specified in the form -flag <value>. This simplifies processing arguments that might be lists, or strings that might have embedded spaces.
So here's bracket.tcl:
    # bracket - create a montage of various exposure levels of the current
    #           image operating on the current crop region. Exposures are
    #           made with the ExrToneMap operator.
    #
    # elow   - initial exposure value
    # ehigh  - maximum exposure value
    # nsteps - the number of brackets to make
    # args   - optional args:
    #  -o <output> output image name (default _montage)
    #  -i <input>  input image name (default current image)
    proc bracket {elow ehigh nsteps args} {

        set cat [it GetCurrentCatalog]

        # process any optional args
        array set argmap $args
        set i [ice::getopt argmap -i {}]

        if [string equal $i {}] {
        set img [$cat GetCurrentImage]
        # don't bother continuing if we can't find an image
        if [string equal {} $img] {
            error "no current image"
        }
            set i [$img GetHandle]
        }

        # unless specified the output image's handle will be "_montage"
        # users can specify -o <handle name> to override this.
        set o [ice::getopt argmap -o _montage]

        # crop is a string, we let the io code parse it
        set crop [$cat GetCropRegion -fmt Ice]
        it IceExpr "$o := bracket($i,\"$crop\",$elow,$ehigh,$nsteps)"
    }
Notice how ice::getopt works: if the user doesn't use a -o option the output of this script will be called “_montage”. A catalog always has a crop region; if none has been dragged out in the GUI it defaults to the entire image. The last line of the script calls and IceMan script with a routine called bracket. This doesn't exist yet, so we'd better create that now. First we'll just create a stub to get this going and test the tcl part. So enter the following in your bracket.io file:
  bracket := method(in, cropStr, elow, ehigh, nsteps,

      // tcl is very string oriented, io has numbers as
      // first class entities. Its also good at lists
      crop := cropStr split map(s, s asNumber)
  )
This gives you a first look at how to create a IceMan script routine. As mentioned elsewhere, the IceMan script language is based on Io. All this method is doing is taking the cropStr argument and splitting it up, which returns a list, and then uses map to turn all the elements of the list into Numbers. More information on the Io language can be found here.
Now to check all that works start “it”, load an image and then, in the console window, run it with:
bracket 0 3 9If you open the Message Log window and set the filter level to Debug you'll be able to see what your script is doing. If you drag out a crop window on the image first and then run your script you'll see the crop window coordinates being passed down to the IceMan script.
|
3 — THE ICEMAN PART |
Time to make the IceMan part do something for real. Change bracket.io to:
    bracket := method(in, cropStr, elow, ehigh, nsteps,

        // tcl is very string oriented, io has numbers as
        // first class entities. Its also good at lists
        crop := cropStr split map(s, s asNumber)

        // calculate the size of the montage image. We're going
        // to separate each element of the bracket by a 20 pixel
        // border and we're always going to do five small images
        // across
        cols := 5
        border := 20
        cWidth := crop at(2)
        cHeight := crop at(3)
        mWidth := ((cWidth + border) * cols) + border
        rows := (nsteps/cols + 0.5) roundDown
        mHeight := (cHeight + border) * rows + border

        outBox := list(0,0, mWidth, mHeight)
        // make a big image to put all the little copies into
        result := IceImage FilledImage(in ComponentType, in Ply, outBox, list(0))

        // crop out the part of the source image we're going to work on
        src := in SubImage(crop)

        e := elow
        for (r, 0, rows-1,
            for (c, 0, cols-1,
                // translate the cropped image and then "tone map" it.
                offset := list(border+c*(border+cWidth),border+r*(border+cHeight))
                small := src Move(offset)
                small := small ExrToneMap(e, 0, 0, 5, 2.2)

                result := result CopyFrom(small, small DataBox)

                if (e == ehigh, break)

                e := e + ((ehigh - elow) / nsteps)
            )
        )

        return result
    )
A couple of important things to note here: first, notice how in the loop we keep referring back to the cropped portion of the original image in the variable src. No need to make explicit copies of this image; IceMan handles all that for you. Also note how we can use the result of an operation (like ExrToneMap above) and assign it back to the same variable. Since you are no doubt wondering, IceMan keeps track of all these images and when they go out of scope they get released. No need to worry about deleting these intermediate images; life is good!
Now to try this out, run “it”, load up an image, and drag out a smallish crop window, say about 100 pixels square. Then, in the console window, type:
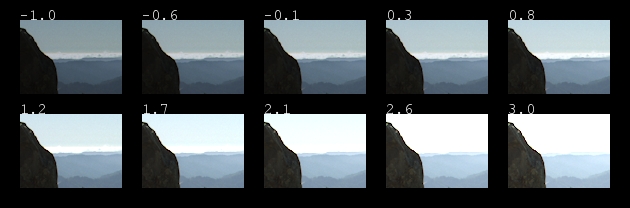
bracket -1 3 9You should see a nice montage of your crop window at various exposure levels. Cool…you can show this to the lighting director to get her to buy off on one of the levels.
Now if you've ever had to do this in a darkened screening room with who knows who else in the room, causing distractions, you'll know that sinking feeling when the director says, “The one second to the left…” and then, as she walks out the door, says, “Actually no, the other left.”
Right then you'd wished the battery in your laser pointer hadn't just died. Well, we have another solution up our sleeves! We'll use IceMan's oh-so-handy text rendering feature to put labels onto each exposure bracket, spelling out which value was used. No mistakes in our reviews…
Here's the new version of bracket.io with text labels
    bracket := method(in, cropStr, elow, ehigh, nsteps,

        // tcl is very string oriented, io has numbers as
        // first class entities. Its also good at lists
        crop := cropStr split map(s, s asNumber)

        // calculate the size of the montage image. We're going
        // to seperate each element of the bracket by a 20 pixel
        // border and we're always going to do five small images
        // across.
        // Hard code some parameters we might later pass as arguments
        // to the script
        cols := 5
        border := 20
        textSize := border * 0.75

        cWidth := crop at(2)
        cHeight := crop at(3)
        mWidth := ((cWidth + border) * cols) + border
        rows := (nsteps/cols + 0.5) roundDown
        mHeight := (cHeight + border) * rows + border

        outBox := list(0,0, mWidth, mHeight)
        // make a big image to put all the little copies into
        result := IceImage FilledImage(in ComponentType, in Ply, outBox, list(0))

        // crop out the part of the source image we're going to work on
        src := in SubImage(crop)

        e := elow
        for (r, 0, rows-1,
            for (c, 0, cols-1,

                offset := list(border+c*(border+cWidth),border+r*(border+cHeight))
                small := src Move(offset) ExrToneMap(e, 0, 0, 5, 2.2)

                // The DataBox is the area where the image has pixel data
                result := result CopyFrom(small, small DataBox)

                // Create the label
                label := IceImage DrawString(e asString(1,1), textSize, textSize)
                // Use the same position offset which due to where DrawString
                // renders text means this will convienient be in the border
                label := label Move(offset) Shuffle(list(0,0))
                result := result Over(label)

                if (e == ehigh, break)

                e := e + ((ehigh - elow) / nsteps)
            )
        )

        return result
    )
You might notice that in this final version we have combined some operations on one line. So the construction of the small variable is the result of a Move, followed by a ExrToneMap.
To put the text onto the montage we used the Over operator, which implies the presence of an alpha channel. Since the DrawString operator doesn't provide an alpha channel we fake one by duplicating the single channel in the text image using Shuffle. Over doesn't mind if the background (the montage) is rgb and the text is single channel. It just extends the single channel out so your text will be white.
Here's a sample run made on a image of Mount Tamalpais in Marin County, CA. The source image was one of the sample images you can find at the OpenEXR website
|
Pixar Animation Studios
|