Prev |
Next
To get started, let's open the Maya scene, optimize.ma.
(Where are the tutorial files?)
|
1 —
OPTIMIZING SCENES FOR RENDERING |
Armed with a few general rules, it's easy to optimize your scenes for maximum
performance. You can realize large performance gains by taking
the renderer into consideration early in your 3D pipeline, during modeling
and shading. All models are not created equal, and you'll find geometry
has a substantial effect on render times. It is common to find
that inefficient modeling and/or shading creates unnecessary bottlenecks when it
comes to rendering, and when shots are ready to render it's usually too late
to fix poor, inefficient models and shaders. By planning in advance, you can avoid
squandering valuable render cycles. In this tutorial we'll go through some of the steps that you can use to
optimize your scenes for RenderMan.
Make sure you've opened the tutorial file, optimize.ma.
|
2 —
USE GEOMETRY RENDERMAN LIKES |
RenderMan prefers NURBS and subdivision surfaces over
polygons. In general, NURBS and subdivision surfaces will look better and render faster and
more efficiently than an equivalent object modeled from polygons. This holds
particularly true for complex curved topologies, where polygons generally require
a much denser mesh to approximate curved surfaces.
For simpler models, like a
box, the surface type is less important, and polygons may be faster. Generally
complex organic objects with lots of curves, like animated characters, are best
modeled as subdivision surfaces.
Now Render the Maya
scene:
Render-> Render Current Frame
You should get an image like the
one below:
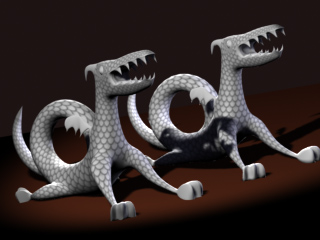
On the left is a
subdiv dragon. On the right is a polygon dragon
RenderMan renders true-curved surfaces (tesselating geometry into
micropologons on a per-pixel basis) so there are never any tesselation issues
with spheres or other curved surfaces. These surfaces will always be smooth,
never faceted. If we take a closer look at the alpha image in the scene
above, the undesirable faceting of polygons is clear. We can see this in the
image below:
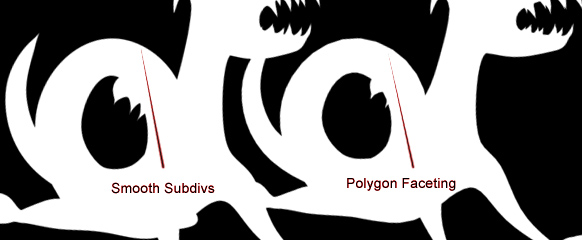
The alpha
emphasizes the faceting in the poly model
Because RenderMan
prefers subdivisions over polygons, go ahead and delete the polygon dragon.
|
3 —
USE SINGLE-SIDED SURFACES |
Whenever possible, use single-sided geometry. This allows the renderer to
throw away half of the surface with no further processing, doubling the
rendering speed for that object. Obviously, an
object should not be single-sided if the interior or back faces can be seen.
Next we'll turn the dragon into a single sided object.
1) Select the dragon in Maya.
2) Open the Attribute Editor.
3) Toggle off Render Stats-> Double Sided.
The dragon will now be more
efficient to render. Setting double-sided surfaces to single-sided will make a
big difference when rendering larger scenes.
Adding too much detail to a model can slow rendering down. During the
modeling phase consider the final placement of an object in a shot, and if a detail is
ultimately smaller than a pixel, don't model it. During the modeling stage it
can be tempting to build as much detail into a model as possible. Avoid that
temptation. Add only
the detail that's required and render times will dramatically improve.
Also, avoid unnecessarily dense geometry. Polygon meshes should be
just dense enough so that tessellation artifacts are not a problem. Subdivision
surfaces should always have as few vertices as possible. NURBS should have only
as many isoparms as required. Extra geometry means extra work for the renderer. Take the
case of a NURBS sphere — it is equally "round" with six
or 600 isoparms. In either case it's a sphere, but you will notice that the NURBS
sphere with 600 isoparms takes much longer to render.
Ultimately, it's not always feasible to model for each shot, but it is good practice to be aware
that the complexity of models has a direct impact on render times.
The subdiv dragon in our scene has
the right amount of geometry. In the image below we can compare this dragon (as
seen on the right) with another dragon (on the left) which has too much
geometry. Both models look the same when rendered, but the heavier model on the
left carries a greater, and unnecessary, overhead.
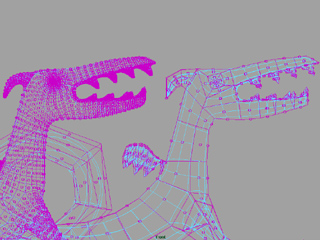
The model on the
left is inefficient — too much geometry.
The model on the right uses less geometry to define the same form.
|
5 —
USE SHADERS TO ADD DETAIL |
Sometimes it's better to apply
displacement (or bump) shaders to simple geometry than to
actually build complex geometry. Take the example of this dragon. Perhaps we
want to add scales. These scales could be modeled outright, which would create
a much heavier model. Alternatively, a displacement shader can be used to add
scales to the dragon much more effciently. By letting
RenderMan handle small details during rendering, you'll be able to render lighter models
faster. As a bonus, you will also accelerate your interactive Maya
sessions because you are using lighter models.
To attach scales to the dragon,
we'll attach a pre-made displacement shader.
1) Select the shader "scales_lambert" in the Hypershade
2) From the Hyper shader pick:
        Edit-> Select Objects with Materials
3) Now attach the displacement shader. From the Rendering Menu select:
Lighting/Shading-> Assign Existing Material-> scales_displaced_lambert
Now render the
scene again:
Render-> Render Current Frame
You should get an image like this,
with nice displaced scales:
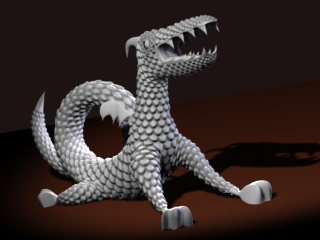
A dragon with
scales added by a displacement shader
Following a few simple guidelines during modeling and shading will have a
positive impact on
render times:
1) Use efficient geometry (NURBS and subdivision surfaces) for
complex organic models.
2) Use single-sided surfaces and process half as much geometry.
3) Don't over-model. Model “for the shot” as much as possible.
4) Use shaders to add detail. Let RenderMan do the modeling, and accelerate
your renderings and interactive workflow in Maya.
|
Pixar Animation Studios
Copyright © 2003 Pixar. All rights reserved.
Pixar®
|
Pixar Animation Studios
Copyright©
Pixar. All rights reserved.
Pixar® and RenderMan® are registered trademarks of Pixar.
All other trademarks are the properties of their respective holders. |
RenderMan® are registered trademarks of Pixar.
All other trademarks are the properties of their respective holders.
|