
Monitor: An Overview of the Alfred User-Interface
Alfred job status can be monitored using two display interfaces:
- the integrated Alfred monitor (described here)
- the limited web browser or HTTP interface
The built-in monitor is automatically launched, by default, when the
first job is spooled. If several alfred jobs are spooled in succession
they queue up on the single dispatcher associated with each spooling
user, and the growing job queue is displayed by the monitor. It is also
possible to attach a monitor to a remote dispatcher by using the
"alfred -h user@host" invocation; hence
it is possible for a single dispatcher to be updating several monitors
simultaneously. See the alfred(1) manual page
for more information about alfred invocation options.
The annotated image below shows how the top-level Alfred window looks
during the processing of a typical job queue. Three jobs have been
spooled to this dispatcher, over the course of several minutes.
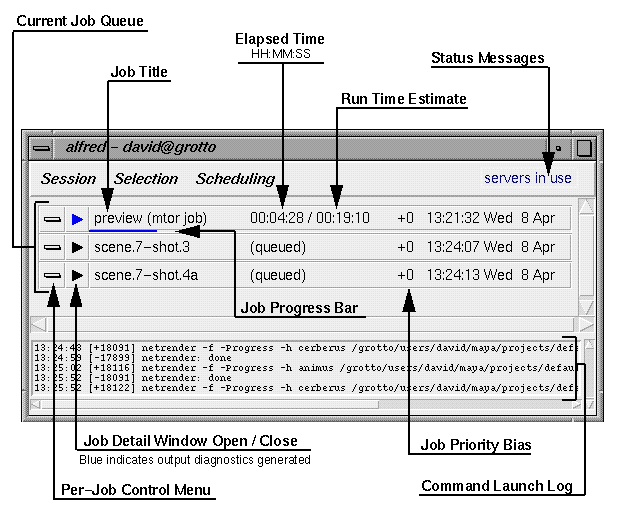
- Current Job Queue
- There is one entry in this list for each spooled job.
Each job contains a group of tasks to process.
- Job Title
- The job title is either the job filename or a string
defined internally by the job script.
- Elapsed Time
- This is a running count of the wall-clock time spent actively
processing each job. It includes time spent waiting
for remote processors.
- Run Time Estimate
- An estimate of the total time required to complete each job.
The estimate is refined as the job progresses.
- Status Message
- Short descriptions of the current dispatcher state.
Detailed messages appear elsewhere.
- Command Launch Log
- This is a running log of the actual commands launched by
the dispatcher. It shows the launch time and PID of each
launched (child) process. A matching done/exit entry is
logged as each command completes. Note that several commands
can be active at one and that they might finish in any order.
- Per-Job Control Menu
- Clicking on this button brings up a menu of control operations,
for associated job.
- Job Detail Window Open/Close
- Opens or closes a window which shows the detailed job
structure and current status (described below).
- Job Progress Bar
- This blue line grows towards the right to indicate
approximately how much of the job is complete.
- Job Priority Bias
- Each job has a default priority when requesting remote
servers; any user modification to the default is indicated
here.
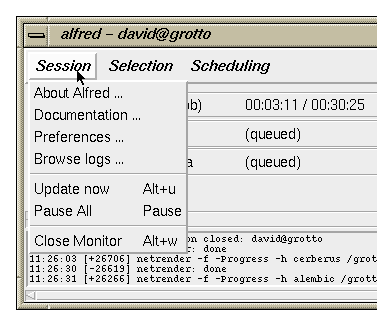
The Session menu provides basic controls over alfred:
- About Alfred... displays Alfred version information.
- Documentation... launches a browser to display the
online alfred documents.
- Preferences... brings up a dialog box for changing
various behavior and presentation parameters.
- Browse logs... displays the entire command log history
in a separate text editor window (the editor to launch is determined by
environment variables, either $WINEDITOR is launched directly or $EDITOR
is launched in a separate xterm window).
- Update now forces the dispatcher to refresh the monitor's
display. This can be useful if a process is interrupted or the monitor and
dispatcher get out of sync for some reason.
- Pause All toggles between a paused and unpaused
state. When paused, all currently running commands (clients on the local host)
are sent a STOP signal and no new dispatching occurs. Unpausing sends a
CONTINUE signal to the stopped processes and resumes dispatching.
- Close Monitor closes all alfred UI windows and the monitor
process exits. The dispatcher remains active until all the
queued jobs are complete. Just starting another alfred will automatically
connect a new monitor to the currently running dispatcher, which is useful
for checking on the progress of long-running jobs.
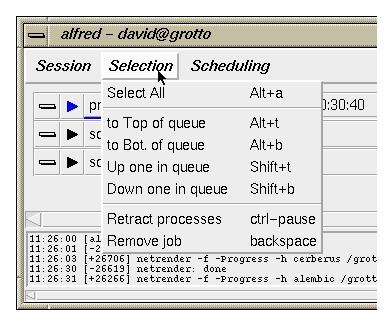
The Selection menu provides control over the job queue.
Multiple jobs can accumulate in the scrolling alfred window, and they are
processed in top-to-bottom order (which is the order in which the dispatcher
receives them). The commands on this menu operate on all of the currently
selected jobs.
To select a job just click on the job title or the
time fields. Shift+click adds a job to the current selection.
- Select All
selects all of the jobs in the queue.
- to Top of queue moves all selected jobs to the
top of the dispatching queue. Any running commands in the previously
topmost job will continue to execute; any new dispatching begins with
the new topmost job.
- to Bottom of queue moves all selected jobs to the end
of the queue.
- Up one in queue moves the selected job(s) one
position higher in the queue order.
- Down one in queue moves the selected job(s) one
position lower in the queue order.
- Retract processes interrupts any running commands
for all selected jobs, and pauses the entire dispatcher. Interrupted
commands (and their tasks) are reset to ready-to-execute state. This is
useful when you don't want to kill a job, but want to remove renderings
from the current set of bound servers.
- Remove job removes all of the selected jobs from the
queue and discards them. Any running commands in the discarded jobs will
be killed.
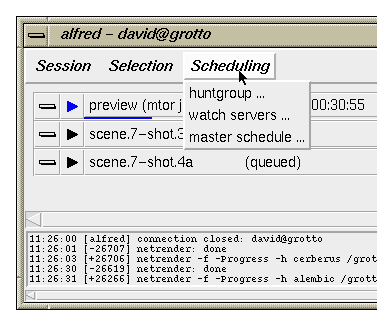
The Scheduling menu provides access to the status and
availability of remote servers.
- huntgroup opens the job properties dialog,
the most important of which is the user's current list of
candidate servers, or huntgroup. See the
next section for details.
- watch servers opens the
maitre-d status dialog.
There are several types of data about the current state of the
resources managed by the maitre-d. The display is automatically
updated at regular intervals.
- master schedule opens the schedule editor.
brings up an interface to the global
service schedule. This is a collection of mappings which define names
and attributes of remote servers and user access to them. If the current user
has write-permission for the alfred.schedule file, then this
interface also provides a way to modify the current settings. See the
Scheduling document for
detailed information on this interface. The huntgroup
dialog (below) also provides per-dispatcher controls over some schedule
parameters.
The Huntgroup: Servers available to a dispatcher
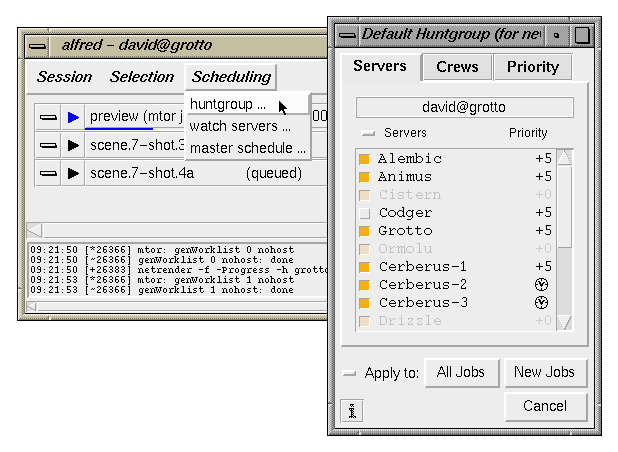
The huntgroup for a dispatcher is the list
of server slots to which it currently has access. This list is generated
by the maitre-d, which in turn derives its information from the current
alfred.schedule file, which contains
service definitions and user access permissions for them.
A service is just the name of a reservable slot on a
particular remote host. Typically these are associated with a
daemon running on the host. For example, if a workstation named
cerberus is running a copy of the alfserver software, and it has been
configured to support several rendering slots, then we might name these
Alfred services "Cerberus-1, Cerberus-2...". Naming is done
through the schedule editor, usually by
a project coordinator or system administrator, and the names are
arbitrary although they usually reflect the host name or service type.
The schedule file also defines when specific users have
access to groups of servers. Entries displayed with the small
clock icon are unavailable at this moment due to the
schedule's time restrictions. They may become available later, possibly
even during the course of a job.
It is sometimes desirable to avoid using a particular server even though it
appears in the huntgroup (it might be misbehaving, or down for servicing, or
needed for a demo by Someone Who Must Be Obeyed).
The checkboxes next to each service name can be used to
temporarily remove a service from the dispatching list; in this example,
the server named "Codger" won't be used by this dispatcher.
In the common situation where users' desktop machines
are also listed as potential servers in the schedule, it can sometimes
be useful to deselect the dispatcher's local host. That is,
in situations where the clienting load is high, it can be helpful to make
sure that the dispatcher doesn't also send server work to the local host.
Note that the huntgroup dialog opened from the Scheduling menu
affects all jobs, and sets the default for future jobs.
You can also modify the huntgroup on a per-job basis; see the next
section.
See the NIMBY document for a discussion on how to
keep other dispatchers on the network from using your desktop machine
as a remote server while you're trying to get work done.
In addition to the "Servers" tab on the huntgroup dialog,
there are also tabs for Crews and Priorities. These are somewhat
more advanced features which also control which servers are bound to
a job. See the Priority discussion for
details and examples.
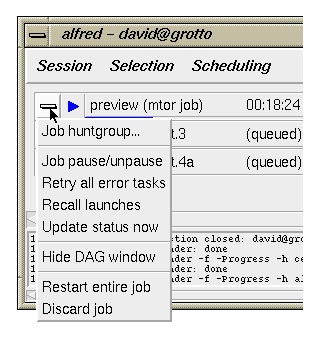
At the far left of each Job-Queue entry is a menu of per-job controls.
These provide access to several frequently-used actions:
- Job huntgroup ...
Opens a huntgroup dialog which is just like the one described
above, except that it only affects the
server selections and priorities for the given job.
- Job pause/unpause ...
Jobs can be paused, and later unpaused, individually.
- Retry all error tasks ...
Sometimes errors encountered during a job are transitory,
they might be related to a particular server or a full disk, etc.
This entry causes all tasks with errors in the given job to be
reset to their unexecuted state; they will be retried as usual
when dispatching continues.
- Recall launches ...
All currently running commands launched from the given job
are interrupted and reset to their unexecuted state so that
they will be redispatched as usual later. The entire
job is also paused, so that no new commands are launched until
the job is unpaused by the user. This is useful for temporarily
clearing jobs from the currently bound remote servers.
- Update status now ...
Forces the dispatcher to immediately updated the monitor with
all of the current status information for the given job.
- Hide DAG window ...
If the Job Detail Window is open for the given job, then this
entry just causes it close.
- Restart entire job ...
Causes the current job to be interrupted, all running commands
are terminated. The job is restarted from its initially spooled
state.
- Discard job ...
Removes the given job from the queue and discards it. If the
job is still active then all of the running commands are terminated
first.

Click on the job-detail button to open a subwindow which
displays the job's internal task structure, arranged as
a hierarchy of dependent execution blocks.
Note: this type of node hierarchy is sometimes referred to by the
more general term directed acyclic graph, or DAG.
The green blocks are currently executing, the dark blocks
are waiting to execute, and light gray indicates completed tasks.
Tasks on the left are higher (later) in the execution hierarchy,
they depend on those to their right. Tasks along the right edge are
the leaf nodes of the tree, they must complete before their
"parent" nodes to the left can begin.
The dispatcher traverses the job tree looking for commands to launch.
It uses a depth-first search in which it starts at the top
left, and then looks right and down until it finds the
first, right-most node which is ready to launch.
Ready tasks are those whose dependents to the right have completed.
If there are several ready tasks available, they may be allowed to
execute in parallel, depending on the availability of remote servers
and other resources.
Note that ready tasks are launched in depth-first order but due to
differences in execution time they may finish in any sequence. Under
some circumstances ready-to-launch leaf nodes may be started out of order
(not in strict top-to-bottom sequence); this happens when all servers
of a particular type are in use but leaf tasks later in the tree require
a different type which is available. The idea is to maximize throughput
by keeping as many remote servers as possible in use.
See the Introduction to Dispatching
document for more details.
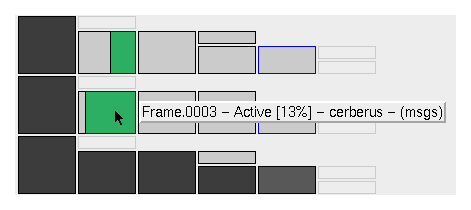
A brief status balloon is displayed as the mouse is swept over
each task node. The snapshot above shows that the task titled
"Frame.0003" is actively rendering on a server named
cerberus and the image is 13% done; there are also
diagnostic messages which can be viewed.

Blocked tasks are waiting
for their child nodes (to the right) to complete before they
can begin processing their own commands.

Thwarted tasks are ready to execute but are
being delayed by a built-in gating heuristic. Certain special types
of tasks, expand and iterate nodes, dynamically
add new task nodes to the current job when they execute
(see the Cmd syntax discussion
for details). Thwarting occurs when the walk-ahead limit (a user
preference) has been reached, it disallows dynamic expansions to
minimize the number of new ready-to-execute tasks.
This behavior is useful because the processing of these
nodes often involves the indirect generation of new RIB files,
and the delay keeps these potentially large files off the disk until
they can actually be rendered.
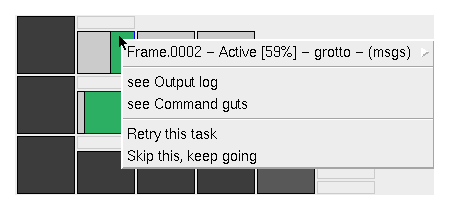
Click over an individual task node to get the task control menu.
- title - status ...
The top entry displays the task title and any current status
information, such as command progress, currently bound servers,
and whether the command has generated diagnostic output.
- see Output log ...
If there is diagnostic output, this entry will be enabled and
it will open a text window displaying the messages (see below).
- see Command guts ...
Displays the command details of a particular task node (see below).
- Retry this task ...
If a task has errors, this entry allows you to retry it.
- Skip this, keep going ...
If a task has errors, this entry allows you to skip it as if
it had completed normally. This allows the parent nodes to
continue processing.
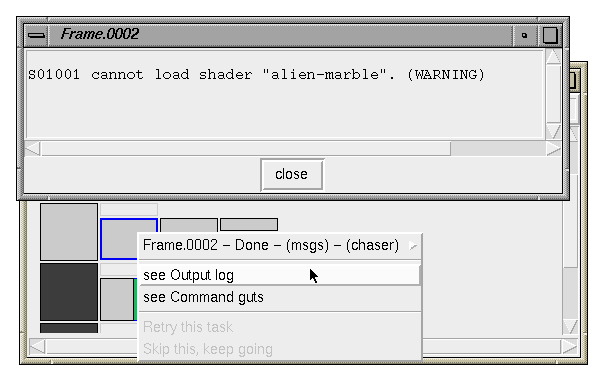
Sometimes a process launched by alfred generates output, these might be
normal informational messages, error messages, or non-error warnings.
When this happens, the monitor draws a blue outline around the
associated task. Click on the task and selecting
"see Output log" to retrieve the output generated by that
particular task (anything written to stdout or stderr). In the
example below a rendering has generated a warning. As a shortcut,
clicking on a task with the middle mouse button opens the output log
directly.
Tasks which have errors are drawn in amber. From Alfred's
perspective, an error is either: a failure during command launch such
as a bad path, or the launched application terminates with a non-zero
exit status. Some poorly-behaved applications which return random exit
values to the environment can often still be used with alfred if they
are called from within a simple shell script which is more careful.
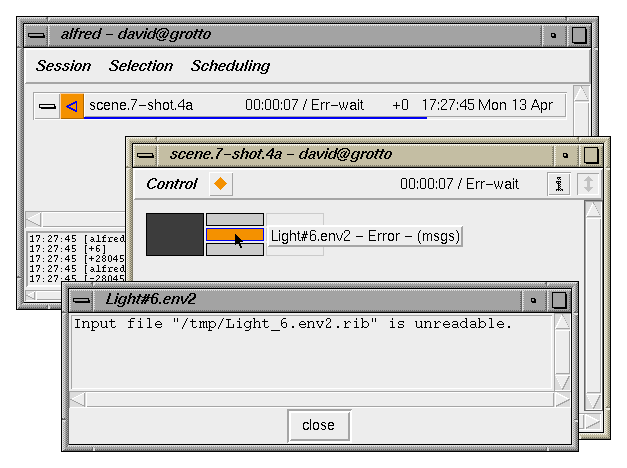
When a task encounters an error, it blocks further execution of tasks
which depend on it farther up the hierarchy, to its left.
If the launched command generated error messages (not always!)
they appear in the task's output-log.
Note that tasks which aren't dependent on
the error task continue to be dispatched. Eventually, when all
remaining tasks are blocked by the error, the job will go into
Error-Wait mode, which means that it will remain in the
queue until it is removed, or the error condition is cleared; the
dispatcher will proceed with other queued jobs.
If the problem which caused the error is transitory, or has been
fixed, you can try restarting the task using task menu item
"Retry this task". Sometimes during previews or
testing it is acceptable to use the menu item
"Skip this, keep going" to simply ignore the failed
task and continue with the rest of the job as if it had succeeded.
Note that there is also an entry in the
Preferences dialog which allows you to specify a fixed number of
automatic retry attempts. If this feature is enabled
the dispatcher will attempt to rerun the task until the attempt limit is
reached, then it will block and be marked as a regular error.
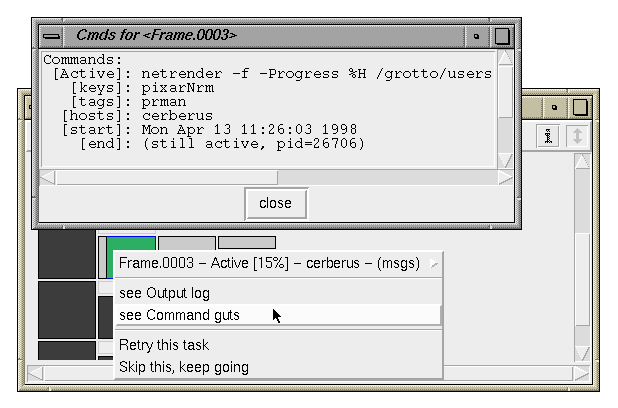
The Command Guts menu entry displays the detailed
internal components of individual tasks. This can be useful in
understanding errors or other dispatching problems. These are the
launch expressions specified by the spooled job script as well as
any current status information, such as the name of the remote host, etc.
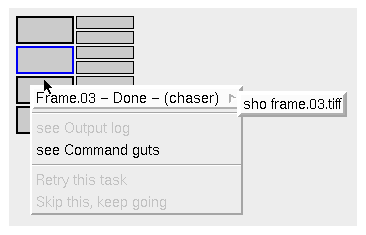
Some Alfred script-generators, such as MTOR, embed script
items called task "chaser" commands which can be launched by
the user from the UI when the task has completed successfully. Typically
these are used to launch an image tool to display the results of
a final frame rendering. Tasks which have a chaser commands
will be displayed with a heavy border, and the top entry in the task
menu will become a cascading menu which launches the command. Note in
the example below that the second high-level node has both a chaser
(bold border) and an output log (blue border).

- When there are errors in a job, this button appears on the menu bar.
Click on it to automatically scroll to the next error task in the tree.

- Click on this button for brief balloon help about this window.

- Click on this button to toggle automatic scrolling on and off.
By default the task window scrolls to show tasks as they become active.
- in the task-tree (a.k.a. DAG) window, the middle mouse button
is equivalent to selecting the "see Output log" entry
on the per-task menu (i.e. it brings up window which displays any
output messages generated by the commands in a particular task).
- in the task-tree window, Alt + middle-mouse is equivalent
to selecting "see Command guts" from the task menu (the
Cmd details and state are displayed for a task).
- the Escape key closes / hides the current window; in dialog
boxes it is the same as pressing the "Cancel" button.
- in the main job-queue window, clicking the job-open button
(black triangle) with Alt + left-mouse causes the window
to automatically open using the "primary" saved window
geometry (the first reshaped/placed DAG-window location).
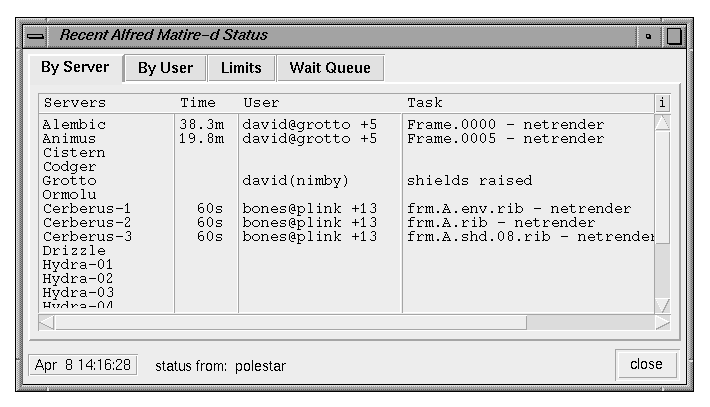
This status display is opened from the
Scheduling->watch servers menu on the Job Queue window.
It provides a regularly updated listing of the currently
defined services (named slots on server hosts) and their status.
The tabs across the top of the window each display a different
aspect of the current status information.
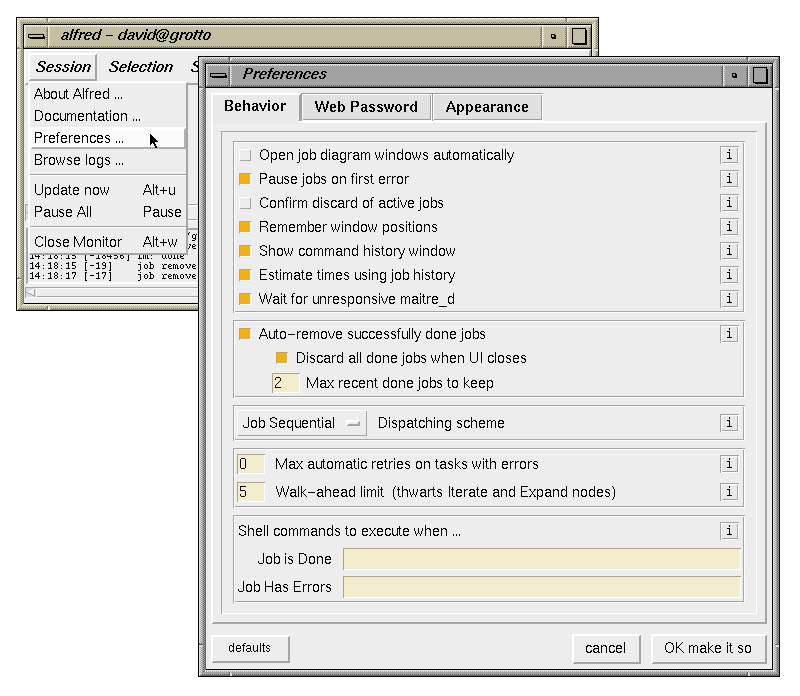
Much of Alfred's dispatching behavior can be tuned to suit
individual user's preferences. The default behavior for a
site is determined by the alfred.ini file.
The preferences window allows user to modify these defaults,
unless they are LOCKed in the initialization file.

Note that descriptions of each preference item is
available by clicking on the small "i"
button on the right.
Pixar Animation Studios
(510) 752-3000 (voice)
(510) 752-3151 (fax)
Copyright © 1996-
Pixar. All rights reserved.
RenderMan® is a registered trademark of Pixar. |