'it' Basics
Introduction
“it” is both a very simple utility and a highly complex and powerful tool. It can simply be your framebuffer, or display, or it can be your be-all and end-all of image processing, taking advantage of the robust IceMan image processing environment.
To use “it” as your primary display, select your preference from the Render Current Frame options menu (see the image below).
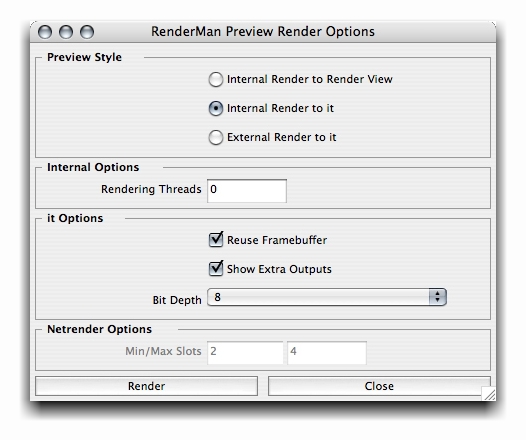
Internal Render to it means you are rendering via Maya to the internal RenderMan renderer and viewing the rendered images in “it”. External Render to it dispatches your render job through Alfred to netrender, a component of RenderMan Pro Server.
The User Interface
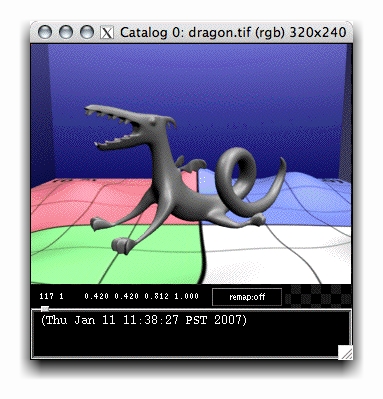
When rendering to “it” through Maya, your images are no longer viewed through Maya's Render View window; a new “it” window is opened. The “it” window can be customized by selecting view options via the “it” menu. The status bar gives you progress information during renders and reports the position and rgba values relative to your pointer's placement upon your render's completion. In addition, there is a separate field for notes, which can be entered via the Common tab of the Render Settings.
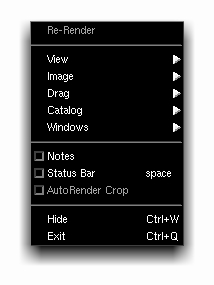
When using “it” via the Maya UI, right-clicking in the frame window provides the user with a basic menu that provides access to all the other “it” windows, as well as much of the functionality available via the Hub.
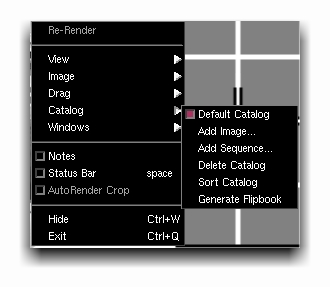
The Catalog sub-menu offers you access to the control over the catalog as it appears in the “it” Hub. You can add images or sequences, delete or sort your catalog, and even generate a flipbook. Additionally, there's control over the look of the image window, as described above, and an AutoRender Crop option that can be enabled. Note that the Re-Render and AutoRender Crop options are not available for images that were simply added to the catalog via the UI.
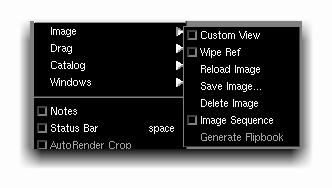
The Image sub-menu gives you control over actions involving the current image viewed in the image window. You can set the image as your primary wipe reference, reload, save, or delete the image, or set an image sequence.
The View sub-menu presents a slew of useful options. You have control over the image zoom and can isolate the channels of the image that you're viewing, plus you can draw a crop window, copy the crop coordinates, and then use those coordinates for more precise control over subsequent render jobs (e.g. to render a cropped region over a sequence of frames).

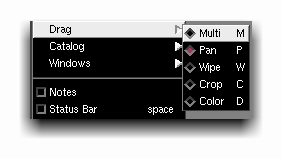
The Drag sub-menu presents you with a list of optional functions for dragging your mouse through the image window.
- The Multi option gives users the “Old School” “it” mouse behavior: left button for drawing a crop window, middle button to copy color, alt + middle button to pan, control + left button to zoom, and right button to access the menu (note that these behaviors can be customized via your it.scheme file).
- Pan limits draggin to panning the image within the window.
- Wipe enables you to wipe the current image with a previously set wipe reference image.
- Crop sets your drag actions to drawing a crop window for re-renders.
- Color allows you to select and drag a color out of the “it” image into, for example, Slim.
The Hub
The Hub integrates the basic Catalog view with a script editor window for loading and executing IceMan scripts. At its core, the Hub is your interface for managing your catalog, providing a list of images in the catalog with corresponding catalog refecences (for scripting) and a simple summary of the images' characteristics (dimensions, channels, bit-size).
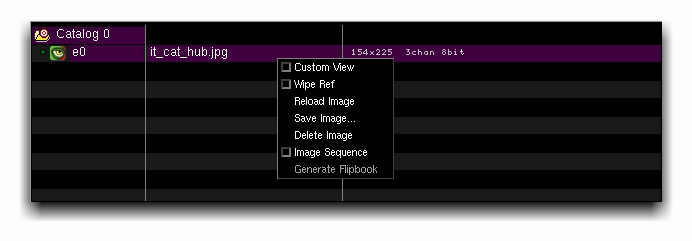
Right-clicking on the image name in the Catalog window of the Hub gives you access to the same image menu accessible by right-clicking in the image window.
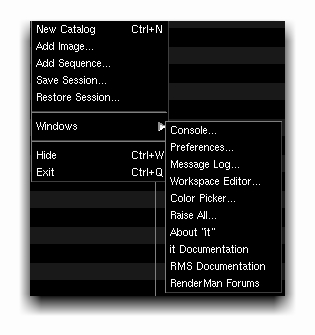
Right-clicking elsewhere in the Catalog window gives you access to the primary Catalog controls for managing the catalog and adding images and sequences, as well as a sub-menu with access to the Preferences, Message Log, Workspace Editor, Color Picker, and Console, or, if you're feeling rather bold, all of them at once.
You can also access the “it” Hub by starting “it” in standalone mode, via the command line or your Programs/Applications menu.