 Painting RenderMan
Primitive Variables with Artisan
 Painting RenderMan
Primitive Variables with Artisan
Introduction
Maya Artisan is a powerful painting tool which allows you to interact
with nearly arbitrary Maya surface attributes via a painting
interface. Artisan is not part of the standard Maya release but can be
obtained from Alias at additional cost. If you have Maya
Artisan you'll be able to use it in conjunction with MTOR to paint
any number of RenderMan primitive variables onto your NURBS surfaces. Once
you've done this, these variables will be accessible to your custom
shaders.
Set Up
If you have Artisan installed you should notice the following
menu entry: Modify->Script Paint Tool. In order to
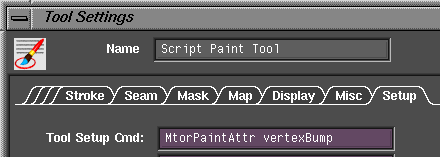
paint RenderMan vertex variables, you need to raise the Setup
panel of the Script Paint Tool as depicted below.

The only step required is to enter into the Tool Setup Cmd field:
MtorPaintAttr jib
where jib is the name of the shader parameter you wish to
paint. When you hit return, Maya will fill in other items in
the panel. Specifically, the Get Array Attr Cmd field will be
filled with something like:
MtorGetPaintAttr rmanFjib
As described in more detail elsewhere,
Maya attributes which follow this naming convention are
automatically made available to RenderMan shaders. Below
you'll find an simple example shader used in the example which follows.
 At right, we've constructed a trivial scene made up of a NURBS
sphere and plane. Next, we set up the Artisan Script Paint Tool
by entering:
MtorPaintAttr vertexBump
Immediately the primitive turns black indicating
that the new vertex variable was successfully created and initialized
to zero.
Now the fun begins. At right you can see the result of some doodling using Artisan. These gray scale values will be later interpretted by my shader as altitude values on my surfaces. After attaching my special shader to these surfaces and rendering, I get the third image in the sequence. Notice that my bumps appears to be smoother than those represented in Maya. This is due to the fact that Maya interpolates these variables linearly. RenderMan, in contrast, uses the same interpolation method as is used to interpolate your surface CVs, namely NURBS (Non-Uniform Rational B-Spline) interpolation.
Well this worked so well, that I'm ready to add another variable. As you might imagine, you can add any number of variables to a surface. One important limitation with Artisan (version 1.5 at this writing) is that it only supports painting of scalar values. We can't, for example, paint RGB values onto the surface in one pass. Furthermore, Artisan only supports NURBS surfaces and so can't be used for polygon meshes (or subdivision surfaces, darn). The fourth image in our sequence is a vertex variable named vertexRedden. My simple shader uses this variable to add some red to the surface color.
Now we render and get the final image in our sequence.
When using this powerful technique you'll want consider the following:
Vertex variables come at some cost in rendering time and RIB size. Unfortunately, due to the way Artisan currently operates, it's possible to create unwanted vertex variables. You can find out what attributes are associated with a NURB with the following command:
deleteAttr -query nurbsPlaneShape1

// Result: rmanFtest mtorSurf rmanFvertexBump rmanFvertexRedden //
In this example, rmanFtest is an unwanted variable, rmanFvertexBump and rmanFvertexRedden are desired vertex variables and mtorSurf isn't a vertex variable since it doesn't start with rman (it represents the attached surface shader).You can delete unwanted attributes as follows:
deleteAttr -at rmanFtest nurbsPlaneShape1The use of special purpose shaders is not strictly required in order to use vertex variables. Specifically you can paint standard RenderMan variables like "s" and "t" with this method. Now we can modify the behavior of any shader that refers to s or t.
/*
 * a simple variant of plastic to show the use of
 * vertex variables.
 *
 * the key detail is the declaration of
 * vertexBump and vertexRedden with the class
 * modifier varying
 */

surface
testvertex( float Ks=.5, Kd=.5, Ka=1;
    float roughness=.1;
    color specularcolor=1;
    float Kb = 1;
    varying float vertexBump = 0;
    varying float vertexRedden = 0; )
{
    normal Nf;
    vector V;
    color cc;

    Nf = N;

    /* bump the surface by Kb * vertexBump */
    if(Kb != 0)
    {
	point PP = transform("shader", P);
	Nf = normalize(ntransform("shader", N));
	PP += Kb * vertexBump * Nf;
	PP = transform("shader", "current", PP);
	Nf = calculatenormal(PP);
    }

    /* add red to the surface color */
    cc = Cs + color(vertexRedden, 0, 0);

    /* standard plastic shading model */
    Nf = faceforward( normalize(Nf), I );
    V = -normalize(I);
    Ci = Os * (cc * (Ka*ambient() + Kd*diffuse(Nf)) +
	    specularcolor * Ks * specular(Nf, V, roughness));
    Oi = Os;
}
|
Pixar Animation Studios
|