 Palette Editor
 Palette Editor
File Menu
Create Appearance Menu
Edit Menu
Palette Menu
Appearance Menu
Duplicate SubMenu
Instance SubMenu
Package SubMenu
A Slim palette is a container of appearances. The palette editor is the user interface for manipulating a Slim palette and serves as the primary point of departure for most of Slim's functions. Using the palette editor you can:
import RenderMan shaders and Looks (.slo, .via, .vma files)
create custom shaders based on the installed templates
create sub palettes
rearrange appearances via drag/drop operations
duplicate appearances and networks
rename appearances
delete appearances
invoke the Appearance Editor on individual appearances
write palettes to disk
Also when using Slim as an appearance server (e.g.: for MTOR) you can:
attach and detach appearances to objects in your scenes
delete appearances that aren't used in your scene
display those appearances attached to the currently selected objects.
Create a new Palette - RenderMan-> Slim-> New Palette
Rename an Appearance -double clicking on the label portion of the appearance icon make the label editable.
Invoke the Appearance Editor - just double click on an appearance. If you have the Conserve Menus preference enabled the new appearance will take the place of the previous one in the main Appearance Editor window. To force the opening of a new Appearance Editor window depress the Ctrl key while double-clicking on the appearance.
Select Multiple Appearances -just drag a rubber banded rectangle around those appearances you wish to select. If you depress the shift key during the selection you enter toggle-selection mode - this way you can group select and unselect appearances.
Rearrange Appearances - select one or more appearances and, using the middle-mouse button, drag and drop them to their new positions.
Place Appearances into Sub-Palettes - drag selected appearances onto a sub-palette icon. Also, newly imported or created appearances are placed in the current sub-palette.
Duplicate Appearances - right-click on the appearance to view the Appearance Menu. From there select between Node or Network. You can also duplicate appearances by drag/dropping them between palette editor windows.
Open/Close Collected Appearances - shift double-click on the collected appearance.
Attach/Detach a Shader to an Object - invoke the Appearance Menu by right-clicking on the appearance.
Invoke a Text Editor on an Appearance - if you're a Slim expert you may wish to edit an appearance in its ASCII representation. To invoke your visual editor (as defined by the WINEDITOR environment variable). first enable the Expert Menus preference. Now when you depress the Alt key while double-clicking on the appearance you can invoke your visual editor. Make sure you don't also have an Appearance Editor window open on the same appearance as the results of your edits may be unpredictable. Once you've opened an appearance in your visual editor you'll find that you can edit descriptive texts, parameter labels and ranges. Certain other fields, such as the parameter names (as distinct from parameter labels) should not be changed. Familiary with the .slim file format is assumed.

The palette editor's menu bar is divided into two sections. The top half is your run-of-the-mill menu bar and the bottom half provides filtration services for the innumerable appearances which you'll house in this palette. Individual menus are described below with the exception of:
The Msgs menu - this menu gives you access to the message log window. The color of the text will change when some interesting tidbit of information is written to the message log. When the color of this entry is blue or green, the information is informative only. Warnings and errors cause yellow and red colorations. At any time you can use this menu to raise the message log window.
The Help menu - this menu allows you to view contextually pertinent web pages from the online documentation.
As for the filters section: filters provide a means to view a subset of all the appearances in the palette. You can enter a filtering expression for the appearance name and master and you can choose to display appearances of a particular type. The expressions are in the form of standard "glob style" string matches. The simplest filter is the character '*' (as above) and results in matching all appearances. The type filter menu allows you to view all appearances of a specific type (more below) and also offers:
_Attachable - display only those appearances that can be attached to objects.
_NotAttachable - displays only those appearancees that can not be attached to objects.
_Selected - displays only those appearances that are associated with the current selection. This option is only available when running Slim as an appearance server.
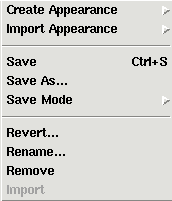 File Menu
The File Menu contains functions related to reading and writing files.
Create Appearance - Create any number of different materials which can be used in the construction of Slim shading networks.
Import Appearance - Invokes the standard file brower to allow you to select any number of external appearances. Usually you'll select shaders and looks with this command. Slim looks first for an associated .slim file and if that's not found will invoke the toslim utility which considers information in .sli, .slo, .vma and .via files during the on-the fly generation of a .slim file.
Save - Saves the current external palette to disk. Will create a checkpoint of the palette if the checkpoint preference is greater than zero.
Save As... - Prompts you for the filename of your new external palette. The new palette will be created with a unique palette ID and names for appearances contained within the new palette. This can be used to convert an internal palette, where all palette data is saved in your scene file, to an external palette, where only the name of the palette file is stored in your scene file.
Save Mode - Allows you to select whether the palette will be saved in "Minimal" or "Full" mode. Saving a palette in Minimal mode will reduce its file size and its read time. A palette saved in Minimal mode can only be read by Slim version 6.5 or later.
Revert... Revert to previous version of the palette, created via Slim's automatic checkpointing feature. The amount of palette checkpoints that are preserved is set by Slim's checkpointing preference.
Rename... - Allows you to set the name of your palette. This is only available in server mode and is only useful for internal palettes.
Remove - Removes this palette from the current scene. Only available in server mode. You can add the palette via the Add Palette command in the Slim client menu.
Import - Use to internalize an external palette. The new internal palette will be given a unique ID and for the name of appearances contained within.
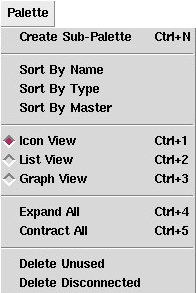 Palette
Menu
 The Palette menu provides commands that operate on the collections of items within your palette.
Create Sub-Palette - creates an empty container for appearances. You can drag/drop appearances and other subpalettes into and out of this sub-palette.
Sort By Name - reorganizes all appearances hierarchically and alphabetically.
Sort By Type - reorganizes all appearances heirarchically and by type.
Sort By Master - reorganizes all appearances hierarchically and alphabetically by the master string. This is handy to help track down differences between absolute, relative and variable references.
Icon/List/Graph View - controls the view mode for the icons in the palette. Icon view draws larger icons in a continuous 2D layout. List view presents more detailed information about appearances but is strictly 1D from top to bottom. Graph View opens the the interactive graph interface.
Delete Unused - deletes all appearances that aren't in use by the client application. This command is only available when using Slim in server mode.
Delete Disconnected - deletes all non-attachable appearances that aren't connected to any attachable appearances. This command is available in both server and standalone modes.
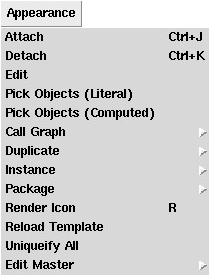 Appearance
Menu
 The Appearance Menu applies to the currently selected appearance(s). Each command pertains to specific types of appearances and may only be meaningful if a single appearance is selected. The menu is updated every time the selection changes and several of the commands may be disabled at any moment. This same menu is availabe by right-clicking on an individual appearance in the palette. When invoked in this manner the commands are applied to the appearance below the mouse and not to the current selection.
Attach/Detach - attaches or detaches the selected appearance to the current selection in the client application. This command is only enabled when running Slim in server mode. Generally when an appearance is attached, any conflicting appearances that were previously attached are, in effect, detached. For example, when attaching an Ensemble to and object, any Slim surface or displacement appearances that were previously attached are detached.
Edit - brings the selected appearance into the Appearance Editor.
Pick Objects - selects all objects in the client application that have the current appearance attached. The inverse of this operation - displaying those appearances in the palette that are associated with the current selection in the client is controlled via the type filter described above.
Call Graph - updates the callgraph window with the selected appearance at the top (right) of the graph.
Diplicate - presents the duplicate menu described below.
Instance - presents the instance menu described below.
Package - presents the package menu described below.
Render Icon - causes all selected appearances to re-render their icons. Useful after opening palette that had icon saving disabled.
Reload Template - causes all selected appearances to reload their templates.
Uniqueify All - reassigns the unique identifiers of all nodes in the palette. This is often useful for ensuring that a copied palette doesn't conflict with its original.
Edit Master - switches the reference to the master of the selected appearance between a global (fully specified) path and a local (relative) path.
 Commands
Menu
Commands
MenuAdd custom tcl procedures. Commands can either be straight tcl procedure calls or can create a custom graphical user interface for interacting with the user. You can load your own custom commands by loading your own .slim extension in the slim.ini. Some useful tcl procedures are provided (and the source may be edited (and studied) via "$RATTREE/lib/slim/customui.slim") :
GenerateReport - This is the verbose report, providing copious amounts of data. Generate a report which enumerates external resources and reports warnings. The report is printed to the Slim Message Logger.
GenerateReport (Short) - The short version limits the report down to warnings. Generate a report enumerating warnings. The report is printed to the Slim Message Logger.
String Search & Replace - Another new procedure called ::Slim::SearchReplace can be used to search for and replace a specified pattern with specified replacement in string entry fields of Slim appearances. Information on arguments for this procedure can be found in the Slim Scripting documentation under the Miscellaneous section. Be aware that there is also a new dirmap functionality in the Workspace Editor which may actually be more appropriate for certain purposes than ::Slim::SearchReplace.
For an example of how to create your own custom command refer
to:
Example:
Adding a Custom Command .slim File
This menu controls how the selected appearance is duplicated.
Node - duplicates only the currently selected node, and any nodes collected within it. The duplicate will be renamed by appending a unique string of the form "_#".
Network - duplicates the currently selected node and all downstream connections. All duplicated nodes will be renamed as described above.
 Instance
Menu
Instance
MenuThis menu presents commands for working with Instances. Instances refer to a specific shader generated by an appearance network but can have different values for any parameters marked as External.
Create Instance - creates a new instance of the selected appearance. The new instance will use the same master as the appearance.
Update Instances - updates any instances of the selected appearances. An update consists of regenerating the master shader, reloading the master, and rendering icons for all instances.
Select Instances - selects instances of the selected appearance.
 Package
Menu
 When working with complex interconnected networks of appearances, there comes a time when you are willing to say, “Enough!” Slim offers you three solutions to simplify the interface to an appearance network: Bundle, Collect and Flatten. Collect creates a grouping of nodes used by a selected node. Bundle does the same, but presents the grouping as an atomic unit that can be edited in the Appearance Editor. Both of these methods allow you to continue to modify the network. Flatten, in constrast, eliminates the possibilities of errors and simplifies the interface to the network at the expense of flexibility. Bundle and Collect are tidying operations while Flatten can be thought of as a publishing operation. Flattening is an important part of building shaders.
Bundle/Collect - cause all (non-shared) downstream appearances to be collected within the selected appearance. Collected downstream nodes are moved within the collecting appearance and are generally “out of the way.” Nodes collected via the Bundle operation will be hidden when the bundle is closed, and their external parameters will be presented when the bundle is edited in the Appearance Editor.
Explode - reverses a Bundle or Collect operation. All appearances will be moved out of the Bundle/Collection.
Flatten… - causes the creation of a single appearance from the connected network. The original network is left untouched and a single new appearance is created in your palette. This appearance references a new shader that will be created using the name you specify. Only attachable functions can be flattened and only those parameters that are marked as external appear as parameters to the resulting shader. All other parameters are "baked-in" during the flattening process. The structure of a flattened appearance is defined in Slim's Preferences.
The graph view editor allow you to visually display the connections in a shading network and perform interactive operations to that shading network. Shading networks can be edited directly through the graph editor. Connections between shading nodes can be created, broken, and otherwise edited. The graph editor sports some fancy features.
Create connections by middle-mouse dragging one appearance to another.
Delete connections by right-clicking on connection arrows.
Drag colors, values, and appearance connections from the Appearance Editor to appearances in the graph view editor.
Work with multiple "work areas." Using one work editor for each shading network.
The graph view editor can be opened from the Palette menu selection "Graph View." To display a shading network drag the nodes in the main palette into the graph editor's work area. Alternatively select an appearance and invoke a "Call Graph-> Graph Children" which will open the graph editor and display the shading network.
Each palette has an arbitrary number of "work areas" in the graph editor. Each work area can contain any number of appearance graph nodes. Connections are made by dragging a connection (default : mouse2) from one node to another. When the dragged connection is released an option menu allows the source node to be connected to any compatible parameter in the target appearance.
Right-clicking in the graph editor will bring up the graph editor menu . . .
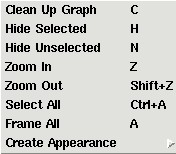 |
Clean Up Graph
Organizes all of the nodes in the work area. Hide Selected Hides selected nodes from the current work area. Hide Unselected Hides unselected nodes from the current work area. Zoom In Makes things bigger. Zoom Out Makes things smaller. Select All Selects all nodes in a work area Frame All Frames all nodes in a work area Create Appearance Add a new appearance directly to the work area. |
In the palette below you can see the graph editor. A shading network is displayed, where a Skin shading model is being connected to an Ensemble. The skin was selected and a connection arrow was dragged with the middle mouse button to the Ensemble.

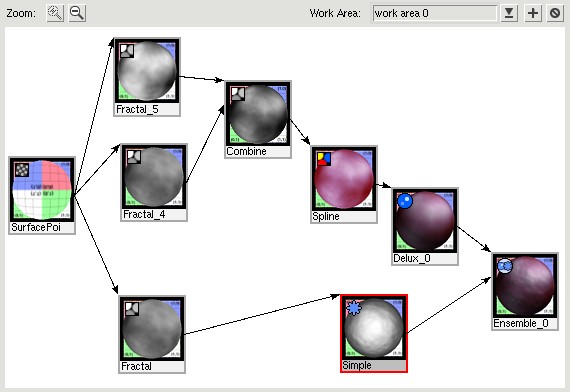
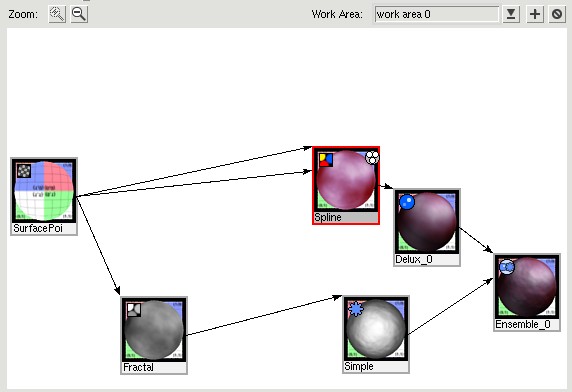
Bundles can be used to simplify the view in the graph editor. Here is a relatively simple graph that we'd like to make simpler:
Slim Appearances live in Slim Palettes. When using Slim with MTOR, you can associate any number of Palettes with a Maya scene file. Typically when starting a new Maya scene you will create one or more empty palettes by using the New Palette command in the Slim menu. Now you can build up your palettes in a standard Slim fashion — by either importing external shaders or by creating new shaders. When you save your Maya file, the current Slim state is encapsulated and saved in the Slim data portion of the MTOR partition of your file. The format of the encapsulation is exactly the same as the format of Slim palette files and is described elsewhere. Since the format is ASCII, you are free to use standard ASCII editing tools (jot, sed, perl, etc.) to edit the contents of the Maya files. One other detail about the Palette file format: there is a Slim preference which controls whether the rendered appearance icons are to be saved. When enabled, the icons are converted to an ASCII representation and included in the palette encapsulation. This results in larger files and longer load times.
Sometimes it's advantageous to store Slim data outside a Maya scene
file. Suppose you want to use the same Slim palettes in many Maya
scene files. To address this issue, Slim supports the notion of referenced
palettes and it's quite easy to convert an internal palette into
a referenced palette — just save the palette via the save command in the
Palette
Editor's menubar. It's just as easy to add an external
palette to a Maya file — just add it! The Add Palette command appears
in MTOR's Slim menu.
| An Internal Palette is saved in the Maya scene file. |
| An External Palette exists as referenced resource. Multiple users can share an external palette. |
When you use external palettes in your scene you'll notice that their encapsulation within the Maya scene files is quite minimal - it's just the name of the palette file. A word of caution: the same thing that makes external palettes powerful also makes them dangerous. When working with external palettes remember that the changes you make to the palette might result in changes to the rendered images in other scenes.
| Checkpoint Overview |
|
Checkpointing is an useful means to preserve previous versions of a palette. Slim provides powerful checkpointing functionality which you can configure to suit your workflow.
To revert to an earlier version of a palette, just use the "Revert" command and select a checkpointed file.
Of course, you'll want to configure Slim to create checkpoints. Slim automatically checkpoints a version of a palette every time you save it -- every time you use the palette's "Save" command. The maximum number of checkpoints that will be kept is set by Slim's checkpointing preference. To turn off checkpointing, set the maximum number of version to zero -- which is the default.
So, a checkpoint is created during "Save" from the Slim palette (when you have a checkpointing preference greater than zero). These checkpoints are saved on disk as *.bk files, in the same directory as the master palette. These files are versioned so that "foo.splt.bk0" is the most recent checkpoint, and higher numbers, such as "foo.splt.bk5," are older. Every time a new checkpoint is created, all versions of that palette will be renumbered accordingly -- i.e. "foo.bk0" becomes "foo.bk1" and so forth. Slim will remove any checkpoint that exceed the maximum allowed, as established by the Slim checkpointing preference.
| Checkpoint *.bk Files
Reverting a palette will open the file picker. In the image on the right, the naming convention for checkpoints is apparent: "foo.splt.bk0" is the most recent checkpoint and "foo.splt.bk5" is the oldest. All of these checkpoints preserve the state of the palette at the particular time it was saved. |
A cautionary word: palette checkpoints share the same unique ID of the master palette and its appearances. This provides for efficient versioning, but checkpoints are not intended to be used as normal palettes. Rather, they are to be used in association with the "Revert" command. To save a palette to disk for later use, use the "Save" command to ensure uniqueness of the palette.
|
Pixar Animation Studios
|