 Placing False Shadows
  Placing False Shadows
 Did you ever have the situation where you really liked the highlight on an object, but the shadow just wasn't in the right place? Perhaps the scene lighting is perfect, except an unsightly shadow is falling too far across a point of focus. Luckily it's possible to position shadows arbitrarily in a scene, simply by casting a shadow from one light that has been created from the position of another light, a false shadow. Using this method the shadow's positioning can be independent from the position of the light casting that shadow. This is one of the strengths of PRMan, being able to freely direct and manipulate the lighting of a scene for dramatic effect, free from the wearisome constraints of physics.
Using a separate light as a "shadow camera", you can create a false shadow. With MTOR shadows are calculated automatically in a light shader whenever the "Create Shadow Maps" selector is set to "every frame" or "once per job." By default, MTOR generates a shadow RIB file using the current light's information for position, cone angle, field-of-view etc. The light source "shadowname" parameter is normally left blank. By specifying some other spotlight in this parameter, MTOR uses the other spotlight to provide the necessary information to generate the shadow RIB file.
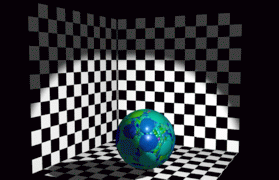
A couple of images may help to illustrate this.
 |
The first image shows our scene with the default spotlight. A normal shadow is correctly cast from this spotlight. The idea here is to move the shadow off to the left hand side of the ball without changing the lighting or the highlights on the ball. |
 |
Second, by duplicating the spotlight, changing direction, and turning off the first light, we get an image much like the one here. Now what I want to do is get the lighting and the highlights from the first image, but the shadow from the second image. This is normally done to slightly tweak a shadow. For this example I have greatly exaggerated normal placement. |
 |
Here is the final image. The first light is illuminating the scene, but it is casting the shadow generated from the position of the light in the second image. |
|
Let's take a look in setting this up. As indicated above, we are now using two spotlights. The light named "SpotLight1" is the spotlight used to light the scene. The second spotlight, named "spotLight2" has been made invisible and is used solely to calculate the shadow. The shapeNode of this lightsource has been named "shadowCam1" to make it easier to remember it's function. This Outliner window shows the two lights, and their associated shape nodes |
 |
To use the second light as a shadow cam is a simple process. In a nutshell, we disable shadow creation in "SpotLight". (We only need one shadow map, generated by the other light.) Enable the shadow creation in the "ShadowLight" spotlight. Then the illuminating light must reference the shadow map created by the shadow light". Here's how we do it:
(The following examples show shadows generated with Slim shading networks, identical methods my be used with MTOR Spot Light, although the parameter names may vary.)
| 1) This light shader is attached to ShadowCam1, and is generating a shadow. This light generates the map. Note that the frequency is set to "every frame" here, but it does not reference a shadow map under "file". This light does not illuminate the scene. It's just generating a shadow map. | 2) This light shader is attached to SpotLightShape1, and is casting light and referencing the shadow map. It references the map created by the other light by using the [shdmap shadowCam1] in the "File" parameter. Note that this light does *not* create a shadow map. The map frequency is set to "never". |
 |
 |
This technique is excellent in changing the actual shadow from a lightsource. In addition to changing the direction of the shadow, this technique can be used to improve shadow quality. By narrowing the cone angle of the shadow light to include only the shadow casting objects, you can effectively increase the resolution of the shadowed objects in the shadow file. This is most visible when you have a spot light with a very wide cone angle.
Here's a slightly advanced method where a Map Generator is attached to a coordinate system and generates a shadow maps for the light source. The shadow is generated from the perspective of the coordinate system and then reference by the shadow map. This same technique can be used to reference any kind of map created by a Map Generator, as long as the appropriate syntax is used.
|
Pixar Animation Studios
|