 Texture Mapping and Surface Parameterization
 Texture Mapping and Surface Parameterization
When designing the appearance of your props and characters, the natural parameterization, or "st coordinates", of your surface can often be the easiest means to describe how to lay out a pattern there. Alternate approaches involving projection are also quite useful because they can describe parameterizations that are continuous across multiple surfaces. Projective methods often fall short of perfect in that the simple geometries we use to describe the projections can't capture the complexities of organic shapes with odd topological structures. The general rule on parameterization is: if your problem can be solved with the natural parameterization then use it!
 Maya and MTOR
may Differ
Maya and MTOR
may DifferPrior to MTOR 3.0, MTOR/RenderMan always parameterized NURBS differently than Maya's internal renderer. This "legacy" parameterization results when you constrain the CV ordering to match between the RenderMan representation and Maya's internal representation. This difference is easy to compensate for, but it can lead to confusion if it isn't understood.
Starting in MTOR 3.0, we allow you to choose between the legacy parameterization and the standard Maya parameterization. If you choose the latter, MTOR reorders your CVs (and Primitive variables) to achieve a parameterization match. In order to support backwards compatibility we've provided you with two controls. First there's a "gang switch" located in $RATTREE/etc/mtor.ini. This preference (mtorNURBSStyle) allows you to specify that all NURBS should be converted according to one approach or another. In order to guarantee backwards compatibility, we've set the value to "legacy" but you can choose the default behavior for your site or project. The second control is per-NURBS and can be found in the RenderMan->Attributes->NURBS UVs menu. You can select one or more NURBSs and assign either the legacy behavior or the new Maya-match behavior.
Maya has an assortment of useful tools to manipulate the standard parameterization of a surface and the ability to parameterize your surface by chord length. MTOR allows you to take advantage of these Maya tools, but lets you decide whether or not to use or ignore Maya's ideas about parameterization.
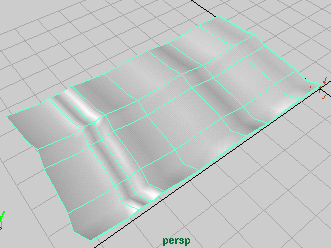
Above is a typical NURBS surface as seen in Maya. If you create and attach a Maya texture to this surface, then render the image using the Maya renderer, you'll get a picture like the one directly below, left. Alternatively, if you create and assign a RenderMan texture (we used the Mondo shader for this example), then render with RenderMan, you'll get the picture below, right. The fact that the pictures are different may at first be rather unsettling.

The difference comes about due to differences in RenderMan's and Maya's definition of NURBS parameterization. On closer inspection, you may notice that the parameterizations aren't that different. In fact we can simply rotate the texture 90 degrees to achieve a match. This turns out to be an easy thing to do. So, rather than simply adopt the Maya default parameterization, we allow you you to decide which parameterization should apply.
When building shading networks with Slim you can compensate for this by using the ST manifold. Simply set the parameter Angle to 270 degrees to match up with Maya.
 To
make the same compensation with the Mondo shader is a little more
complicated. At right are screen dumps from portions of three different
instances of the Mondo shader, as viewed within Slim.
The parameters STMatrix0 and STMatrix1 transform
the natural parameterization of your surface and are present in
most texture mapping shaders. To add these parameters to your
custom shaders, please refer to the source
for the Mondo shader and associated .sli file.
The default values for the STMatrix parameters are represented at top and have no affect on the parameterization. The second set of STMatrix values represent the 90 degree rotation values required to cause the RenderMan image to match Maya's. If you need more precise control over texture placement and scale, you can use Maya's texture placement tools. Currently, MTOR only translates the values associated with UV remapping: Repeat UV, Offset and Rotate UV. Now, you can refer to the parameterization associated with the texture placement tools as indicated by the third (bottom) set of STMatrix values. Here we construct a expressions whose argument is the name of the Maya texture placement node. This can be determined through the MultiLister or Attribute Editor windows.
So now we know how to cause RenderMan to match the Maya parameterization
and this lets you take advantage of Maya's texture placement tools.
However, we still have a problem with our surface parameterization.
In the images above you can see how the texture is squished or stretched
according to the locations of the so-called isoparms. Sometimes
it's desireable to eliminate these distortions and, for this,
a technique known as chord length parameterization can
be employed.
 Starting with Maya 1.5 you can correct this distortion
via the Texture Map controls associated with your surface.
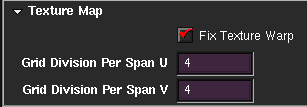
A dump from the Maya Attribute Editor window at right shows the
Fix Texture Warp checkbox. When you enable this feature,
MTOR automatically calculates and attaches the correct RenderMan vertex variables to
perform chord length parameterization. Note that the
chord length corrections are independent of the mapping
issues outlined above. Thus you can toggle this checkbox
on and off and still get the same relationship between
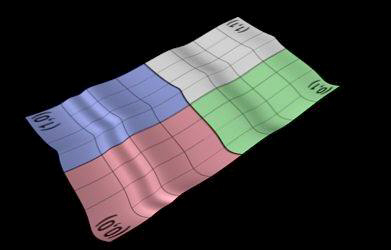
Maya and RenderMan renderings. With Fix Warp enabled,
we get this image:

To correct for parametric distortions, the Fix Warp button can be quite handy. If you plan to animate your surface, however, this isn't the best solution. This is due to the fact that the chord-length calculations are performed every frame and this can cause some unwanted texture swimming artifacts.
 A better solution is to stick the chord length parameterization
at a particular point in time. To accomplish this, choose
the Vertex Variables->st: chord length menu item from
the MTOR/RenderMan menu. The moment you invoke this command,
MTOR computes the chordlength correction factors and sticks
these results to your surface. These values are now associated
with the individual CVs and will move with them. Since the
parameterization values are stuck to the CVs, any deformations
applied to the CVs will affect the texture and you'll get the
familiar and usually desireable rubber-sheet texture distortions.
As discussed elsewhere,
natural projections are not always sufficient. If not, you can use
the Vertex Variable menu entry __Pref: freeze to freeze
the surface CVs into a special vertex variable named
__Pref. Instead of 2-dimensional surface
parameterization embodied in the s and t vertex variables,
this results in a 3-dimensional parameterization which can form
the basis for projective and 3D paint techniques employed in
many RenderMan shaders.
The menu functions associated with RenderMan vertex variables are independent of the Maya version and so you can get chord length parameterization in your RenderMan pictures whether you're using Maya 1.0.1 or Maya 1.5, etc. We've provided some additional features to manipulate RenderMan vertex variables. The Vertex Variables->st: random causes random st values to be associated with the CVs of your selection. This can either be useful for debugging shaders or just to achieve strange results.

Since these functions actually stick data onto your surface CVs, you'll find the st: delete and any: delete commands useful. The latter can be used to delete vertex variables attached by mel scripts or via the Artisan interface.
While NURBS parameterization differs between MTOR and Maya, polygons are more readily transferred without much fuss. MTOR supports many Maya's poweful polygon texturing tools, allowing you to map textures with Maya UVs and then render with MTOR. One of the simplest and most effective ways to do this is to create a slim network that uses a ST manifold, which will painlessly ape the maya UV setup and transfer it to your shader. (Note that subdivision surfaces do not behave is this way.)
|
Pixar Animation Studios
|