RfM Pro, RIB, and You |
![]()
These features are supported by the RenderMan for Maya “Pro” plugin in RenderMan Studio and are not available with the regular RenderMan for Maya plugin.
Perhaps the biggest difference in RenderMan for Maya “Pro” in RenderMan Studio is the addition of support for RIB, bringing together the simplicity of the RfM workflow with the flexibility and power of a RIB-based pipeline. In addition to basic ribgen (fully archived for efficiency, by the way), there is support for RIB boxes using per-node MEL commands (including Ri commands via MEL), “lazy” ribgen, and dynamic RIB archives, users can manually export RIB archives, and there is a new RIB option for Maya command line renders, Render -r rib, which opens still more options for distributed renders. Not to mention, RIB can be generated for selected geometry, for a given render layer, for an implicit passs of a given camera or light, for an explicit pass, or for a class of passes. How cool is that?
Spooling RIB is just about the easiest thing you can do. When you've selected RenderMan as your renderer in Maya, the Batch Render options menu offers you a simple interface with Alfred, the work distribution software included with RenderMan Studio. Once you select “Alfred Spool” you can do immediate, deferred, or remote RIB generation and select netrender (with immediate ribgen) or prman (with deferred or remote ribgen) via Alfred and RenderMan Pro Server. You can also choose remote or local Maya Batch renders via RenderMan for Maya.
If spooling RIB is “just about” the easiest thing you can do, exporting RIB pretty much is the easiest thing you can do. It's all handled simply through Maya's Export function, and you can export RIB archives of your entire scene or any given selection.
To export your RIB archive:
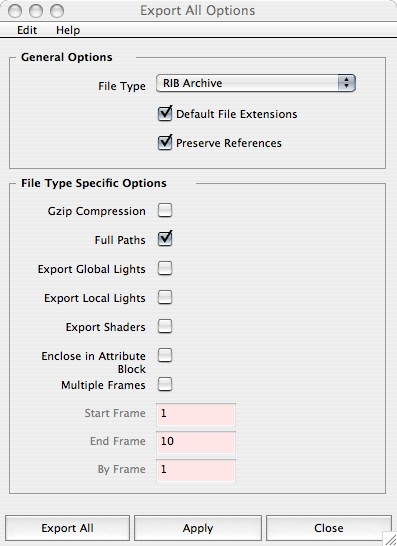
Choose your options wisely. Note that you can choose to export (or not) lights and shaders, mutliple or single frames, and you can apply gzip compression to your RIB archive (quite handy indeed).
In addition, you also generate RIB via a simple MEL command: rman genrib. Boom! RIB generated.
Outside of the Maya UI, you still have a world of options for generating RIB from your Maya scene files. Using Maya's Render command via a command prompt or terminal window. Users familiar with using Render via the command line will recognize the “-r” option — it is used to select a particular renderer, such as the Maya software renderer (-r sw), or RenderMan (-r rman). Now you can render directly to RIB using the -r rib option:
Render -r rib scene.ma
Here is a list of additional options supported with -r rib:
Render -r rman -setAttr ShadingRate 5 -setAttr PixelSamples "3 3" -setAttr motionBlur 1 -setAttr Format:resolution "320 240" filename
Render -r rman -setPref BatchCompileMode zealous filename
name, name.ext, name.#.ext, name.ext.# name.#, name#.ext, name_#.ext
As a shortcut, numbers 1, 2, … can be used.
	"mayabatch local"
	"mayabatch remote"
	"immediate rib, local render"
	"deferred rib, remote render"
	"remote rib, remote render"
- Remember to place a space between option flags and their arguments.
- Any boolean flag will take the following values as TRUE: on, yes, true, or 1.
- Any boolean flag will take the following values as FALSE: off, no, false, or 0.
Additionally, a complete list of the options can also be seen by running the Render -r rman -h command.
For more information about RIB in general, it's not a bad idea to check out the RenderMan Interface documentation in the RenderMan Manual.
For more information about spooling renders via Alfred, please consult the Alfred documentation.
For a tutorial on some simple RIB archiving, check out the Dynamic Read Archives tutorial.
And for more information about Ri commands via MEL, see the Ri for MEL documentation.
|
Pixar Animation Studios
|