Templates: Advanced Topics |
When viewing the source of the Slim-generated shader, you may have wondered how the return value of a function is turned into the final color, Ci. Visualizers are simply a special DynamicShader template. Here, for example, is a visualizer template for the float type:
template visualizer float {
    parameter float floatFunc {
        detail mustvary
        default 1
    }
    RSLSource DynamicShader {
        generate
        output "Ci = [getvar floatFunc];"
	output "Oi = color(1,1,1);"
    }
}
As you can see, other than the specialized declaration of the template name and type (visualizer is the type of template; float is the name), this is just another template. Slim automatically connects the floatFunc parameter to the result of the appearance being visualized, and the result is a usable shader.
Collections, as their name would suggest, collect a group of properties. Collections are just another class of property, so collections can group other collections. There are several ways to use collections.
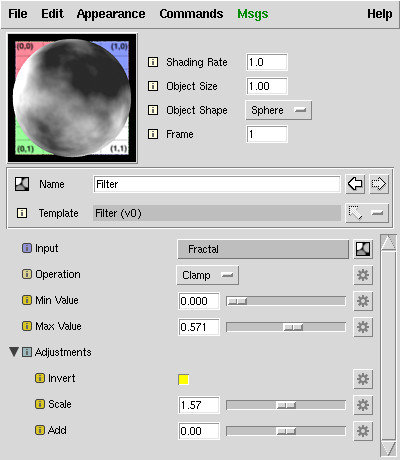
The most common use of collections is to group a set of controls in a template. This is achieved by declaring a collection of type void. This declaration of parameters in an upgraded Filter template groups several similar controls together:
collection void Adjustments {
    state open
    description {
	Post-op adjustments
    }
    parameter float Invert {
	description {
	    Invert result
	}
	subtype switch
	default 0
    }
    parameter float Scale {
	description {
	    Scale to apply to the result
	}
	detail varying
	default 1
    }
    parameter float Add {
	description {
	    Additive adjustment to apply to the result
	}
	detail varying
	default 0
    }
}
With these additional parameters grouped in a collection, our Filter template now produces the following appearance:
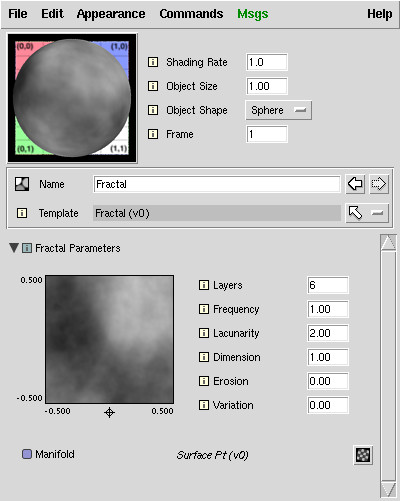
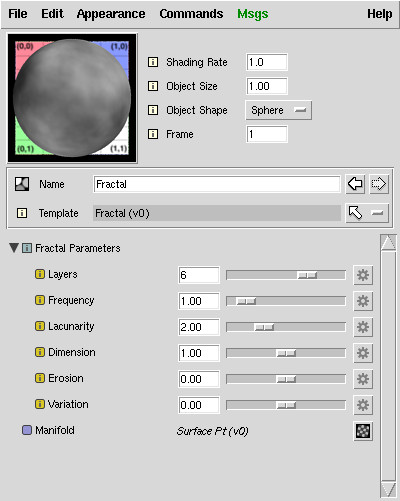
Collections are also used to group a collection of properties and present them using an alternative, custom user interface (or customui). The float Fractal templates use a customui to display a realtime preview of the fractal pattern. Here is how a Fractal appearance is normally displayed in the Appearance Editor:
Collections can also be used to represent a compound type. You may have noticed that illumination templates are of type shadingmodel. Shadingmodel templates return information about both color and opacity. But there is no shadingmodel type in RSL, though, so how does this work? As you can see in this snippet from a shadingmodel template, a shadingmodel is just a collection containing two color parameters. Here is a declaration of the output parameters for a shadingmodel template:
collection shadingmodel result {
    access output
    display hidden
    parameter color ResultColor {
	access output
    }
    parameter color ResultOpacity {
	access output
    }
}
And here is a declaration of parameters for a template that takes a shadingmodel as input:
collection shadingmodel Layer1 {
    description {
	Connect this to a shadingmodel
    }
    detail mustvary
    state locked
    parameter color CLayer1 {
	detail mustvary
	default {1 .25 0}
    }
    parameter color OLayer1 {
	detail mustvary
	default {1 1 1}
    }
}
The detail mustvary line forces a connection. The state locked means that this collection should be represented as a single entity, and users shouldn't be able to open it and set CLayer1 and OLayer1 directly.
Slim will handle any compound type you wish to define. To use a compound type, you must:
That's it. There is no central definition for the contents of a compound type. When making connections, Slim just assumes that the number of input parameters matches the number of output parameters. If they don't match, an error will be generated.
Slim features automatic type conversion, which allows a user to connect a color appearance to a float parameter without any intermediate nodes.
The details of how to convert from one type to another are specified using special conversion templates. These templates are not visible to the user, and have some limitations, but are otherwise no different than any other template.
Here, for example, is the template that defines how to convert a color to a float:
template color ConvertColorToFloat {
    display hidden
    description {
	Template for automatic type conversion from color to float
	Takes luminance of color
    }
    parameter color in {
	provider connection
    }
    parameter float out {
	access output
    }
    RSLInclude "pxslUtil.h"
    RSLSource StaticFunction {
	void pxslConvertColorToFloat(
	    color in;
	    output float out;
	)
	{
	    /* calculate luminance */
	    out = pxslLuminance(in);
	}
    }
}
As you can see, it's pretty simple. It's just a template that has a color for an input, a float for an output, and conversion code inside.
Slim knows to use this template when performing this conversion because of the following preference set in slim.ini:
This preference tells Slim that a user is free to connect a color appearance to a float parameter, and also the name of the template to use when generating the shader.SetPref TypeConversionTemplate(color,float) \ pixar,ConvertColorToFloat
You can convert between your own custom types by writing conversion templates and setting preferences like the one above.
When developing templates, you may encounter cases where, for the sake of modularity, you split your functionality among two or more templates. It would be useful, though, if that fact were transparent to the user.
This hidden modularity can be accomplished using inline connections. With an inline connection, the two (or more) connected nodes appear as one in the Palette and Appearance Editors.
You can specify an inline connection on the detail line, e.g.:
detail mustvary pixar,MicroManifold inline
The connection to this template will resemble a collection. Opening the collection instantiates the template and presents the parameters of the template for editing. Because the node will not be represented in the Palette Editor, it cannot be disconnected. It can only be deleted.
You may wish to specify that a template is always instantiated with an inline connection. To do this, add:
to the properties of your template.drawmode inline
As an example, the Matte template shown below makes an inline connection to a Diffuse template:
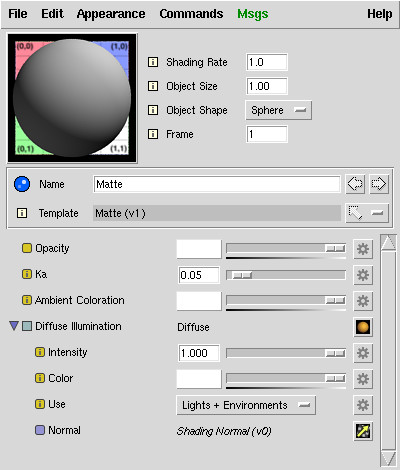
As you can see, but for the purple disclosure widget, this appears just like a collection. But because it is a connection to another template, we have a common Diffuse template that can be used by multiple shadingmodels. Plastic, for example, contains an inline connection to the same Diffuse template.
The Diffuse template referred to above is a shadingcomponent template. Shadingcomponent is a compound type which contains several parameters describing the illumination contributions of the shadingcomponent. The first element in a shadingcomponent is the overall color contribution. What follows is a list of parameters containing the contribution to each of many different illumination styles.
This set of contributions flows through the entire system of combining and layering. A shader fitted to handle this data will know, in addition to Ci, the total contribution from ambient lighting, diffuse lighting, specular lighting, and can output this information as Arbitrary Output Variables (AOVs).
This is the current list of contributions that are tracked in a shadingcomponent:
Every factory shadingcomponent template will contribute to one or more of these styles of illumination. Here, for example, is the template for an Ambient shadingcomponent:
template shadingcomponent AmbientSC {
    label Ambient
    description {
	Ambient illumination
    }
    parameter float Intensity {
	description "Intensity of ambient component"
	range {0 1 .001}
	default 1
	detail varying
    }
    parameter color Color {
	description "Color of ambient component"
	detail varying
	default {1 1 1}
    }
    collection shadingcomponent result {
	access output
	display hidden
	parameter color col {
	    access output
	}
	eval [::aovOutputParameterMacro]
    }
    RSLInclude "pxslAOV.h"
    RSLSource StaticFunction {
	void pxslAmbientSC(
	    float Ka;
	    color coloration;
	    output color col;
	    DECLARE_AOV_OUTPUT_PARAMS
	)
	{
	    INIT_AOV_OUTPUT_PARAMS

	    col = 0;
#if SLIM_SHADERTYPEID != SLIM_TYPEID_light
	    col = coloration * Ka * ambient();
#endif
	    c_ambient = col;
	}
    }
}
As you can see, macros (both in Tcl and in RSL) have been defined to assist in the delcaration and initialization of the contribution parameters. The important step is the last line of the Ambient function, where it sets the c_ambient parameter (delcared via the DECLARE_AOV_OUTPUT_PARAMS macro) to the amount of ambient light. This value will flow through illumination functions and layering functions and eventually be written to an AOV. Automatically.
The most powerful use of shadingcomponents is via the Delux shader, which combines an arbitrary set of shadingcomponents. Here we have used Delux to combine Diffuse, Rim, and BackScattering to create soft, velvetine shader:
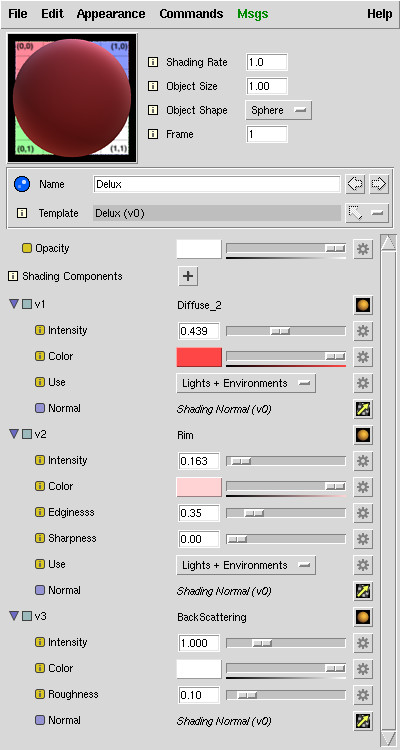
Delux is a shadingmodel_aov template, which means it will accept illumination contributions from shadingcomponents and set them to Arbitrary Output Variables. As you can see, it does little more than allow the user to add new shadingcomponents which are editable using inline connections. This means that you can make Delux even more powerful by creating new shadingcomponent templates. This allows you to concentrate on a specific effect (CD-like diffraction? jewel-like glimmer?) without worrying about reimplementing things like diffuse or ambient. It also means your users are easily able to combine effects in ways you might not have imagined.
You might like to reconfigure an appearance based on the value of a parameter, or more generally, execute a script whenever the value is changed. Message handlers allow you to trace the execution of methods like SetValue and execute a script to handle it.
Here is an example of using a msghandler to show or hide one property based on the value of another. In this example, we have a torattribute
called "BakeStyle" which can be set to one of three different values: ptcToTex (texturemap), ptcToBkm (brickmap), or ptcToPtc (pointcloud).
The second torattribute, "TextureResolution", only applies when baking a texture, so we'd like to when BakeStyle not set to ptcToTex.
The msghandler below is executed everytime the SetValue method is called, which is what the Appearance Editor calls when a user changes the value. Via substitution, it is given the handle of the BakeStyle property. With the use of some property methods, the msghandler queries the current value, determines the appearance in which the property resides, and then finds the TextureResolution property that exists in that appearance. Then, based on the current value of BakeStyle, it either shows or hides the TextureResolution property and updates the editor accordingly:
torattribute string BakeStyle {
    default ptcToBkm
    detail uniform
    subtype selector
    range {
        texturemap ptcToTex
        brickmap ptcToBkm
        pointcloud ptcToPtc
    }
    msghandler {
        SetValue {
            # run this everytime the "SetValue" method is called

            # obj will be replaced by the handle of this property
            set prop %obj

            # get current value, and the appearance of this property
            set val [$prop GetValue]
            set app [$prop GetAppearance]

            # find the property that we are showing/hiding
            set resProp [$app GetProperties -name TextureResolution]
            set curLevel [$resProp GetDisplayLevel]

            if {$val == "ptcToTex"} {
                # BakeStyle is texturemap; make texture res visible
                set newLevel ""
            } else {
                # it's something else; make texture res hidden
                set newLevel hidden
            }

            # update display level, editor
            if {$newLevel != $curLevel} {
                $resProp SetDisplayLevel $newLevel
                $app UpdateEditor
            }
        }
    }
}
torattribute float TextureResolution {
    default 512
    display hidden
    subtype selector
    range { 64 64 256 256  512 512 1024 1024 2048 2048 4096 4096 }
}
A few notes of interest:
Though torattributes are used in this example, the same msghandler could be used for parameters or any flavor of attribute.
Note that TextureResolution is declared as hidden in template. This is because BakeStyle's default value is ptcToBkm.
Because the entire body of a msghandler will be copied to any appearance that is created from the template, you may find it useful to place your msghandler code in a common proc that is referenced by the template. Not only will this keep palettes smaller; it allows you to change the code without having to reload the template for existing appearances.
The Bakeable template from which this example derives does this very thing. Rather than using the code above, it calls a common proc that is used by several templates. Here is the msghandler used by the Bakeable template:
msghandler {
    SetValue {
        ::Slim::CustomUI::pixar::Vis::UpdateVisibility %obj {
            ptcToTex {
                "" TextureResolution
            }
            * {
                hidden TextureResolution
            }
        }
    }
}
Don't be frightened by the "CustomUI" in the proc name. It's simply part of the namespace. UpdateVisibility is a general proc which takes the handle to the property and a description of the parameters to show and hide based on the value of the property. You will also find this used by the EnvMap template and the Combine template. Feel free to use it in your own templates.
Message Handlers may defined for these methods of AtomicProperties:
Though you will undoubtedly spend much time fretting over the design of your template before releasing it to users, you will often find that you will need to make a change after it has been deployed. For this situation, Slim has a template versioning mechanism which you can use to push out changes without worrying about breaking existing work.
If you look at how a palette is saved you will notice that all of the parameters in an appearance is saved, but the RSL Code is not. This keeps the heart of a template (the RSL) central, which means small fixes can be easily deployed.
The downside of this is that if the definition for an RSL function changes, a palette may become out-of-sync with the template. If, for example, a palette is created using a template, and then a new parameter is added to that template, the appearance in the palette will have less parameters than the template. This will often result in errors when compiling the shader. These errors will persist until the user reloads the template.
There are two ways to prevent this from happening. First, Slim 6.5 has an Auto Template Reloading feature. Whenever the current version of a template is requested by a palette, Slim checks to see if they have the appearance and the template have the same number of parameters. If they don't, the template is reloaded.
You can take matters into your own hands, though, by creating a new version of the template. This new version will be used for any newly-created appearances, but the old one will remain present for any existing palettes.
A template's version is declared on the first line of the template, using the templateV construct:
templateV float Filter 1 {
    ...
}
This declares the template as version 1. Using the versionless template construct is equivalent to declaring version 0 of a template.
To make a new version of a template you must:

Looking for more examples of templates? Every appearance that you can create in Slim is based on a template, and all of the templates that ship with Slim are plain text files that you can use as reference. Slim's templates are located in RATTREE/lib/slim, RATTREE
|
Pixar Animation Studios
|