|
Description:
An ensemble provides controls over many aspects of the
RenderMan shading state, including important overrides for ray traced shaders. Note: both shader networks and regular RenderMan
shaders (.sl .slo) can be attached to ensembles.
The
Ensemble's Ray Tracing Controls
Rays
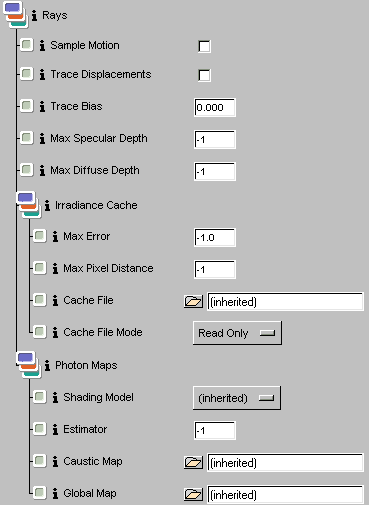 In the Rays
collection tab there are attributes associated with surfaces. These
are the very same controls located in the lower portion of RenderMan
controls. The settings at right are such that the values specified
there are inherited. Changing the settings in the ensemble
allows you to associate independent behavior on a per-surface basis. In the Rays
collection tab there are attributes associated with surfaces. These
are the very same controls located in the lower portion of RenderMan
controls. The settings at right are such that the values specified
there are inherited. Changing the settings in the ensemble
allows you to associate independent behavior on a per-surface basis.
Sample Motion
Controls whether motion blurred objects appear in ray traced results. If your reflective object is moving or deforming you should disable this parameter to avoid self-intersection artifacts. If your mirror isn't moving, set this to 1 to see the reflected objects properly blurred.
Trace Displacements
Controls whether to run displacement shaders to determine ray intersection points. Disabling this option will result in a bump-mapped appearance and make your renders faster. Only enable this if you need to run displacements on the associated primitives.
Trace Bias
Specifies a "fudge factor" for ray intersections. This bias value is added to the ray origin (and endpoint for shadows) to reduce artifacts pertaining to numerial precision limitations and self-intersection.
Max Specular Depth
Limits the number of reflection and refraction ray bounces relative to the associated primitive. The behavior of this setting can be confusing when you consider that it might have different settings along a particular ray path. Lower numbers result in fewer bounces and faster renders. Usually you'll want to set this value to 1 or 2 but you should set this value to the lowest number that gives you the inter-reflection effects you need. Setting this value to -1 results in the default specular ray depth limit
Max Diffuse Depth
Limits the number of soft indirect ray bounces relative to the associated primitive. The soft indirect rays are used to estimate color bleeding and similar effects. The default limit of 1 implies that we should only look a single bounce away to determine color bleeding. The behavior of this setting can be confusing when you consider that there might be different settings along a particular ray path. Lower numbers result in fewer bounces and faster renders. Usually you'll want to set this value to 1 but you should set this value to the lowest number that gives you the inter-reflection effects you need. When used with global photon maps you should never need to set this to a value greater than 1. Setting this value to -1 results in the default diffuse ray depth limit.
Irradiance Cache
These parameters govern the caching of irradiance which is required to obtain indirect diffuse lighting effects. The phrase, indirect diffuse, refers to global illumination that follows diffuse ray paths. This indirect, diffuse lighting is responsible for color bleeding and other subtle effects.
Max Error
An error metric to control quality / speed tradeoff for irradiance cache accesses.. Larger values result in a courser approximation but render faster. Set this value to 0 to disable the irradiance cache. Set this value to a negative number to inherit Max Error.
Max Pixel Distance
A backup error metric governing the use of the irradiance cache. Large values result in course approximations but render faster. Max Pixel Distance is measured in pixels and is usually useful to ensure that the Max Error metric doesn't result in too much work in areas which are large in world space but small on screen. Set this value to 0 to disable the irradiance cache. Set this value to a negative number to inherit the Max Pixel Distance.
Cache File
Usually, it's sufficient to use a single scene-wide irradiance cache and this is specified in the RenderMan Controls dialog. In the case where you wish to "bake" irradiance, it may be desireable to control the irradiance cache settings on a per-primitive or per-object-set basis. In these cases, this attribute can be used to specify the per-object irradiance cache file whose use depends on the File Mode. The easiest way to specify a filename relative to the current project is with an expression of the form: [irradiancecache name] Refer to the description of the Cache File Mode for other usage details. Set this value to (inherited) to inherit the scene-wide default.
Cache File Mode
When the irradiance cache handle is set, this file mode determines how to interpret and update the cache's contents. When the file mode is read-only, we use the given file to seed the run-time irradiance cache. Now during rendering the cache is updated as needed and these updates will be lost when rendering completes. If you set the mode to read-write, the cached results will be stored back into the specified file. If you choose the write-only mode the contents of the file will not be loaded (if it exists) but the file will be updated on completion of rendering.
Photon Maps
These parameters control the creation and access to photon maps. Photons maps come in two flavors - global and caustic. Caustic maps are used on the surfaces where the caustics appear while global photon maps are usually referenced for the sole purpose of estimate light "over there".
Shading Model
Specifies a simplified shading model to employ when tracing photons. If empty, the attached surface shader will be analyzed to determine photon scattering.
Estimator
Controls the number of photons considered when estimating global illumination with photon maps. Also used when precomputing radiance estimates for global photon maps. When used with caustic photon maps, you should set this value to the smallest number you can. This will result in crisp caustics. Higher numbers will make the caustics blurrier. For soft indirect illuminance (color bleeding, etc.) you'll need larger values to get acceptable results. Set this value to -1 to accept the default.
Caustic Map
Specifies the caustic photonmap to use if a shader with the caustic shade-op is provided. Set this value to (inherited) to inherit the value from the global RIB state. Set the value to the empty string to cause no caustic lookups on associated primitives.
Global Map
Specifies the global photonmap to use if a shader which needs to esimate soft indirect illumination at points on the associated primitive. Set this value to (inherited) to inherit the value from the global RIB state. Set the value to the empty string to cause no global lookups on associated primitives.
The Ensemble's General Parameters
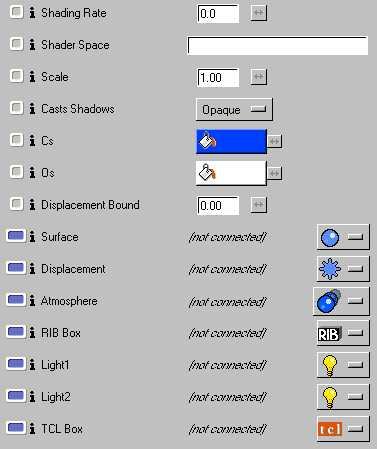 Shading Rate Shading Rate
Controls the quality of the shader evaluation on a per-ensemble basis. If 0, the global value will be used. Generally you'll only want to use this value in the rare case that you want to override the global behavior.
Shader Space
The coordinate system in which a shader is defined. Most shaders perform important calculations relative to this space and so transforming it affects their appearance. If empty, the shader space is the object space associated with the attached primitive. Place the name of a coordinate system object here to set the shader space for the shader. If you're using file referencing, use the "coordsys" function to translate the name of the coordinate system (eg: [coordsys mtorCoordSysShape10].
Scale
An additional uniform scale factor applied on top of the optional coordinate system.
Cast Shadows
Controls how surfaces shadow other surfaces. Possible values for shadow eval are shown below, in order of increasing computational cost. You can optimize rendering time by making surfaces known to be opaque "opaque". To take an object out of consideration during shadow generation, disable the per-object attribute in your modeler. It is important, however, to use "shade" for any surfaces whose shaders modify the opacity of the surface in any patterned way.
Cs
The RenderMan Surface Color Attribute. Note that some shaders don't automatically use this value. You may need to explicitly choose Surface Color as the parameter value.
Os
The RenderMan Surface Opacity Attribute. Note that some shaders don't automatically use this value. You may need to explicitly choose Surface Opacity as the parameter value.
Displacement Bound
This number represents the maximum displacement in shaderspace that your surface will undergo. Be very careful with this parameter as it can dramatically influence rendering times. In particular, make SURE to set this to 0 (zero) if you aren't performing any displacement.
Surface
Attach a shading model
Displacement
Attach a bump or displacement
Atmosphere
Attach an atmosphere effect
RIB Box
Attach a RIB box
Light1
Attach a light
Light2
Attach a second light
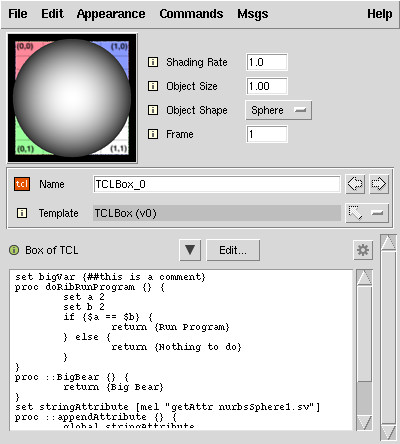
Tcl
Box
Attach a Tcl box
|
 Slim's
Core Functions
Slim's
Core Functions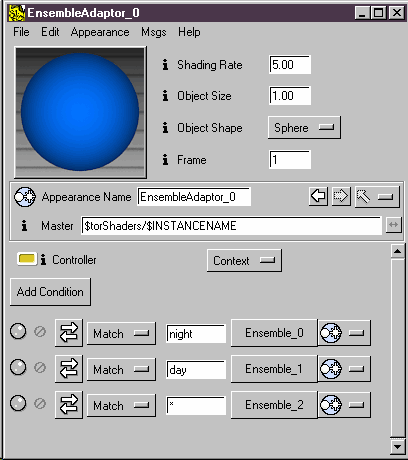
 AOV
AOV Archiver