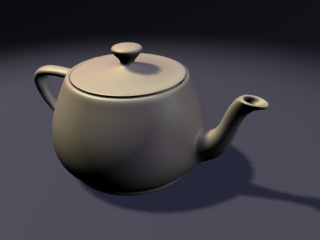
Render the Maya scene, displacements.ma, with RenderMan.
Render-> Render Current Frame
You should get an image like the one below:

Maya Scene
(Rendering time: 3 seconds)
Displacements |
To get started, let's open the Maya scene, displacements.ma.
(Where are the tutorial files?)
|
1 — WITHOUT DISPLACEMENTS |
Render the Maya scene, displacements.ma, with RenderMan.
Render-> Render Current FrameYou should get an image like the one below:
Maya Scene
(Rendering time: 3 seconds)
|
2 — ATTACHING A DISPLACEMENT SHADER |
Next attach the Maya Material, funky_displacement, to the teapot. This Material network has already been constructed for you and can be found in the Maya HyperShade.
Once you've attached the displacement shader, render the scene again.
Render-> Render Current Frame
Now you should get an image with some nice displacement, like this:
Teapot with Displacement Shader
(Rendering time: 6 seconds)
Notice the amount of detail that the displacement shader can quickly create on very basic geometry — even the shadow is displaced. But we're not going to stop here. Next attach the Maya Material, funky_displacement, to the ground. When you've attached the displacement shader, render the scene again.
Render-> Render Current FrameNow we've got a lot of displacement, as we see in the image below.
Entire scene with Displacement Shader
(Rendering time: 7 seconds)
In order for your displacements to be visible in reflections and/or refractions, you will need to add the Trace Displacements attributes to your shape. First, select the geometry, then, in the Attribute Editor, go to the Attributes menu and selectRenderMan > Manage Attributes , select Trace Displacements from the left-hand column of the Add/Remove Attributes window, and click on the Add button.
|
3 — SUMMARY |
Displacements can be used to create detail efficiently in a scene without adding modeling detail. By pushing fine details into a displacement shader (using either procedural functions or texture maps), 3D objects can be modeled with less detail, which can be a big benefit when working with large datasets and complicated geometry. For instance, in the image below an otherwise flat plane has been made more interesting by adding an animated wave displacement (and ray traced refractions):
Displaced waves and ray-traced refractions
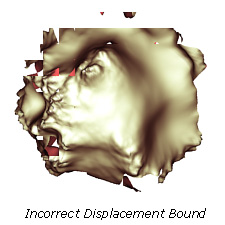
While RenderMan displacements are both detailed and fast, there are a couple of issues that you should be familiar with. The most important concept is displacement bounds. Displacement bounds set up a bounding box around the object, for use when the object is rendered. The bounding box determines when the object is loaded by RenderMan. If a displacement shader pushes an object outside of its bounding box, you will see that part of the displacement is being clipped, like in this image:

The solution in this case is to increase the bounding box. If you need to adjust displacement bounds, simply add the RenderMan displacement attributes to the shader. You can do this by following these steps:
1) Open the displacement shader in the Attribute Editor.2) From the Attribute Editor Menu:Attributes-> RenderMan-> Add Displacement AttrsNow that you've added displacement attributes they will appear at the bottom of the shader under the Extra RenderMan Attributes tab. Open this tab and adjust the Displacement Bounds attribute. The correct setting will vary depending on the size of your object in world space. Generally, a good value to start with is the farthest distance an object may be displaced, as measured in default Maya units, and adjust from there. Note that too large of a displacement bound can cause an object to consume more memory than needed, so the tightest displacement bound possible is recommended.
For more information on displacements see: Bump and Displacement Shaders.
|
Pixar Animation Studios
|