Prev |
Next
The RAT to RMS FAQ
A Transition Primer
|
Introduction
So, you're making the big move, transitioning from the RenderMan Artist Tools
to the new and improved suite of rendering goodies, RenderMan Studio. If you
are unfamiliar with the RenderMan for Maya workflow, you will find that
there are a few tweaks to your workflow. This FAQ is designed to cover the
basics of the adjustment, easing your transition into the world of
RenderMan Studio.
Workspace
RenderMan Studio introduces a complete reconceptualization of the Workspace
and the way that RenderMan resources are managed.
- Output directories now incorporate the new variable, ${STAGE}.
By default, ${STAGE} resolves to your scene name; this is site-
configurable via the RMS.ini file.
- Search Paths now resolve to ${PROJ}, the workspace root. In
addition to across-the-board improvements, this allows intra-project
referencing to work with Slim and RenderMan for Maya Pro.
Additionally, RMSExpression has been exposed, granting users increased
flexibility for site-specific configuration.
NOTE: In order to enjoy these new changes with existing projects, you
will need to delete the existing RATworkspace.ws file from your project's
root directory.
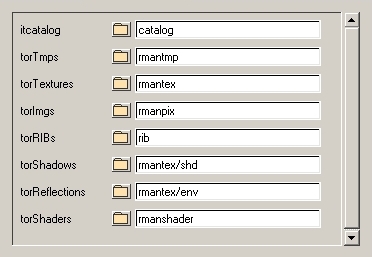
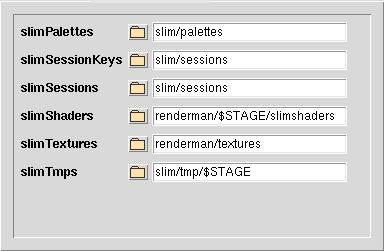
Here's a “Before and After” look at the default directory structure for
Slim resources:
|
|
|
|
The RAT Way
|
The RMS Way
|
RenderMan for Maya also uses the renderman subdirectory of your project
as the starting point for the rest of the renderer's resources. By default,
the following can be found in $PROJ/renderman/$STAGE/:
- data/$FRAME/
- point clouds (.ptc), brick maps (.bkm), shadow
maps (.tex), etc. are generated on a per-frame basis and
deposited here.
- images/
- Final images (when rendered to file via Alfred or Mayabatch renders)
- rib/$FRAME/
- RIB files are generated on a per-frame basis and deposited here. In
addition, per-job RIB files are deposited in rib/job/.
- shaders/
- Compiled shaders (.slo) from translated Maya materials are
stored in this directory.
Separately, texture files (i.e. image files converted via txmake) are
stored in $PROJ/renderman/textures/, along with Slim textures (see
the screenshot above).
Slim
We strongly recommend consulting the Slim
documentation for a complete rundown of Slim's functionality, much of which
is new in version 7.0. Here's a quick rundown of a few important things:
- Attach/Detach
- Assigning appearances has been handed over to Maya. Appearances are
created in Slim and then “added” to your Maya scene. The
appearances are then attached to Maya nodes via the usual Maya ways, e.g.
Hypershade, the Lighting/Shading menu, MEL, et cetera.
- Ensemble Adaptors
- Slim's Ensemble Adaptors are not supported by RenderMan for Maya.
Instead, there is a special RenderMan Attribute that can be added to
Maya Shading Groups via the Attributes menu of the Attribute Editor:
Add Adaptation. The adaptation attribute appears under
the Extra RenderMan Attributes and gives users the same
“adaptive” behavior as Ensemble Adaptors in RAT.
- Light Shaders
- Currently, there is no integrated workflow for adding Slim's light
shaders to Maya scenes. There is, however, a “workaround”:
- Build your light shader appearance in Slim.
- Compile the shader (e.g. click on the preview swatch). This
will create a .slo file in the appropriate
/slimshaders directory.
- Create a corresponding light in Maya.
- Attach a Custom Light Shader via the Attributes menu
for your light's Shape node: Attributes-> RenderMan->
Add Custom Light Shader.
- In the Extra RenderMan Attributes, click on the
widget to create a new RenderManLight node.
- The Shader field in your new node allows you to browse
to the aforementioned .slo file.
- MapGen
- Instead of MapGen nodes, users must create a Reference Pass.
- RIBBox
- RIBBox functionality is now achieved via
Ri
for MEL.
- Archiver
- Users can now use Maya's Export menu to export RIB archives.
- TCLBox
- There is no direct support for adding TCL via RfM. Users can employ
TCL via MEL scripts, e.g. rman tcl subst "tcl bits" or rman
tcl eval "tcl whatnots".
Illumination
There are three critical differences in illumination techniques when you
start using RenderMan Studio. First, as mentioned above,
there is no integrated workflow for adding Slim Light shaders to your scene.
Second, shadows are created by adding Shadow Attributes to Maya lights. And
third, global and image-based illumination are now done via a RenderMan
Environment
Light.
For more information on the shadow workflow, please see the
Deep Shadow tutorial. Further
discussion of global illumination techniques using the Environment Light
can be found in the
Global Illumination tutorial.
Geometry
- MTOR Subdivision Surfaces
- MTOR subdivs “just work”. Existing subdivs are rendered
properly by RfM and, because the MTOR subdiv plugin is unlicensed, in
RMS 1.0 users can load the plugin and use it, happily and without
incident, with the RfM. Creases, crease strength, corners, etc. are
translated “automagically”.
- RIB Archives
- As mentioned above, RIB archives are
created via Maya's Export menu in RenderMan for Maya. They are then
referenced via a MEL script attached to, for example, a Maya
locator.
In this case, select the Locator and attach a Pre Shape MEL
via the Attributes menu. In the Extra RenderMan Attributes,
enter RiReadArchive "archive name"; in the window for the
MEL script.
Rendering
The big difference is probably the most obvious: renders are now
initiated via Maya's UI. A basic rundown is available in the
Getting
Started section of the documentation.
Here are a couple of additional notes on rendering with
RenderMan Studio:
- Spooling Renders via Alfred
- Simple Alfred-spooled renders can be started via Maya's
Batch Render UI. Selecting the options box gives users
access to several different modes:
- mayabatch local (no RIB)
- mayabatch remote (no RIB)
- immediate rib, local render
- deferred rib, remote render
- remote rib, remote render
Note that the Mayabatch “remote” renders still require
Alfserver to be installed on your render nodes.
The Batch Render UI also offers the usual complement of job
options, such as Frames per Server, Job Priority,
and Renderer Arguments.
Miscellaneous
- Ray Tracing Features
- Special ray tracing features (e.g. blur parameters for reflections and refractions) are accessed by
adding “controls” to Maya material nodes.
Prev |
Next
|
Pixar Animation Studios
Copyright©
Pixar. All rights reserved.
Pixar® and RenderMan® are registered trademarks of Pixar.
All other trademarks are the properties of their respective holders. |