Prev |
Next
To get started, let's open the Maya scene, deep_dragon.ma.
(Where are the tutorial files?)
RenderMan For Maya supports Pixar's Deep Shadows. A Deep Shadow is a kind of depth map
shadow that offers higher-quality shadows and supports transparency, motion blur, multi-
sampling, and more. For more details, check out the Shadows
section of the Features and Effects documentation.
Before we get into the finer points of using Deep Shadows we should have a frame of
reference. Render the scene as is, using standard depth map shadows.
Render-> Render Current Frame
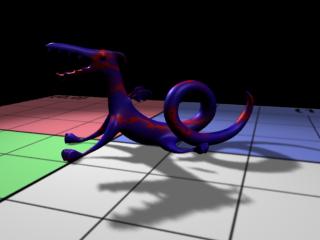
You should get an image something like this:

Depth Map Shadows
First we're going to modify the material attached to our plane to give us a good reference
point. Select the “GroundPlane” material (it's just a Lambert) and let's map a simple
image of a grid to the color. The image is located in the sourceimages folder of
the rfm_project (~/rfm_project/sourceimages/grid.tif).
Deep Shadows are enabled by adding a special RenderMan attribute to your light. In this
particular case, we are adding it to the “Key” light (a spot light). Select the Key
light and add a RenderMan ShadowMap attribute via the Maya Attribute Editor:
Attributes-> RenderMan-> Add ShadowMap Attrs
Scroll to the bottom of the Attribute Editor window and you will see that an Extra
RenderMan Attributes section has been added. Click on the arrow to expand the section and
see the Shadow Map attributes, including Pass Class, Bias, Samples, Filter Size, and Filter.
The defaults here will be fine for our purposes.

In adding the attribute you have also created a separate Deep Shadow “pass” for the
renderer. Open the Render Globals, click on the Passes tab and select DeepShadow
Globals to see the default settings for the pass, which we will discuss in detail later.
Let's see what happens now ...
Render-> Render Current Frame
You should see something not at all unlike this:

Pixar's Deep Shadows
You'll notice that the shadow is ... well ... prettier, more defined, but still plenty soft.
Among other things, Deep Shadows do a fine job of giving you transparent shadows. These are oh
so very useful for things like fur, particles, or perhaps even see-through dragons. Why don't we
take a quick look ...
We can achieve this nifty effect quite simply, by mapping our Material's color to our Material's
transparency. Our dragon has a Marble node attached to the color, so we'll want to add a connection
to the transparency as well. Using Hypershade, you could connect the outColor of the Marble
material (marble1.outColor) to the transparency of the dragonMaterial
(dragonMaterial.transparency), or you could middle-mouse drag the Marble from the Hypershade
window and drop it on the Transparency for the dragonMaterial in the Attribute Editor, or you could…
Well, there are a lot of ways to do it. Once you've done it, re-render.
Render-> Render Current Frame
And Presto-Change-o, your image should look like this:

A See-Through Dragon with Deep Shadows
If, for some reason, see-though dragons aren't your bag, take a look at the Fur
and Particles bits of the Getting Started
section to see just how spiffy deep shadows can be.
As we were going through these steps you might have noticed a lot of parameters and drop-down
menus and sliders and stuff that we just ignored, leaving them at their defaults. Here's a quick
run-down of those bits we temporarily glossed over ...
Extra RenderMan Attributes
- Shadow Type
- This drop-down list defines the type of shadow that RenderMan will use. Its default value
is DeepShadow.
- Shadow Bias
- This offsets the shadow map to prevent self-shadowing artifacts. The default, you might
have noticed, is 0.010.
- Shadow Samples
- Controls the number of samples used for the map. The higher the number, the smoother the
shadow, and the greater the price in rendering time. The default is 16.
- Shadow Filter Size
- The size (in pixels) of the filter applied to the shadow map. Larger filters cause more blur.
- Shadow Filter
- You can toggle between gaussian or box filter types to choose the type of
smoothing that you want applied to your shadow map.
DeepShadow Globals
- Phase
- Choose the frequency that the pass (deep shadow map generation, in this case) is run. Deep
shadow maps, like any map, can be reused. If your map includes only non-moving objects, change
the phase from Every Frame to Once Per Job to reuse the map.
- Shading Rate
- Your shadow map does not necessarily have to use the same shading rate as your final image. Set
a rate for the shadow map here. It will have the same sort of speed/quality tradeoff associated
with the shading rate for your final image.
- Pixel Samples
- The number of pixel samples in x and y for your shadow maps. When using deep shadows, you will
get better results with pixel samples greater than one.
- Motion Blur
- You can disable motion blur or defer to the Render Globals' Features tab from this
drop-down menu. You must enable motion blur via the Features tab if you want motion
blur.
- Ray Tracing
- This has the same effect as the Motion Blur setting, disabling ray tracing or deferring
to the Render Globals' Features tab.
- Default Surface Shader, Expand Surface Shaders, Expand Displacement
Shaders, Expand Light Shaders, Expand Volume Shaders
- Deep shadows use information from these types of shaders, so the shaders must be “expanded”
during the deep shadow pass. A standard shadow map, on the other hand, would only need information from
the displacement shader; if you click on the Shadow Pass entry in the Passes tab you can see
that only Expand Displacement Shaders is enabled by default.
- Determines the size of your shadow map.

RenderMan for Maya's Deep Shadows
respect Maya's Disk Based Dmaps setting; by changing it to “Reuse Existing Dmap[s]” your deep
shadows can be cached and reused, saving valuable render time.
Deep shadows are an easy way to get high-quality effects which would normally require more expensive
ray tracing to achieve, but they are still larger and slower than traditional shadow maps. Like any
feature that carries an added expense, they should only be used when needed. Take some time to explore
the possibilities of using deep shadows, such as their usefulness with fur and particles and their
support for motion blur (for more on motion blurred deep shadows, check out the aforementioned
Particles section of the documentation). Used properly, deep shadows can
be a great help in generating high-quality imagery.
Prev |
Next
|
Pixar Animation Studios
Copyright©
Pixar. All rights reserved.
Pixar® and RenderMan® are registered trademarks of Pixar.
All other trademarks are the properties of their respective holders. |


