Prev | Next


The Slim “Crash Course”

Creating a simple layered shader with Delux


This tutorial is a brief introduction to Slim, covering the basics of creating a shader. Many of the different aspects of using Slim will be covered during the creation of this simple shader, but for all the nitty gritty details, please consult the Slim Documentation.

To get started, start Maya and make sure that the RenderMan plugin is properly loaded.

 1 — CREATING A PALETTE

First things first — start a Slim session. To open Slim from the Maya UI, go to the Maya Window menu and select Rendering Editors > RenderMan > Slim…

When you first open Slim you are in a default Session, with a default Palette. To create a new palette in the Slim window, select New Palette from the File menu. Alternatively, you can use a keyboard shortcut — Ctrl + N. Once you're working with Slim regularly, you'll probably be working with existing palettes. You can open an existing Slim Palette from the File menu, too, or you can use the Ctrl + O keyboard shortcut. Sessions can contain multiple Palettes, and Palettes can be internal or external. For a more detailed look at Sessions and Palettes, see the Sessions and Palettes page of the Slim documentation.


 2 — CREATING AN APPEARANCE

Slim has two operational modes: Browse and Create. As you might guess, in order to create a new palette, you need to be in Create mode. Click on the plus-sign icon to switch to Create mode. The icon's background will change to a nice shade of orange, reminiscent of the flesh of a well-cooked butternut squash.

The primary building blocks for Slim are the “Attachable” appearances. These include surfaces, displacements, lights, and volumes. They are, simply, the appearances that you can attach to Maya nodes. In our case here, select Attachable > Surfaces, and then choose a Layer appearance.


The Palette View


 3 — CREATING A LAYER

So we have, nominally, a Layer appearance. Of course, it has no layers, so it is basically an empty shell of an appearance. Let's add a layer…

Click on the Add Layer button.

Your appearance now has one layer, but it is an empty layer — notice that it is telling you that it is (not connected). Click on the blue widget and select a “Delux” shading model as your base layer.

Adding a layer.


Note that you can now see the Delux node attached to your Layer appearance in the Graph View. Click on the Delux node (in either window) to open it in the Appearance View.

 4 — GETTING AROUND

Getting around in Slim is as simple as can be. You can move around between open palettes in the Palette View. Within an appearance you can choose different nodes right in the Graph View, or you can navigate linearly (think in terms of a Web browser) within the Appearance View using the back and forward buttons. You can also select any “Downstream Appearance” by clicking on the arrow to the left of the aforementioned buttons and selecting the appropriate node.

You might notice, in the image to your right, that there is quite a bit of information, and there are more than a few options for what you can see and how you see it. Be sure the check out the documentation on The Appearance View for all the sordid details. In this particular illustration, we're in the Delux, so you can click on the back button to get to the Layer (which you can also select from the arrow's list), or you can click on the forward button to get to the Spline that we've attached to the Diffuse component's Color parameter…

What's that? You say we haven't attached anything to any so-called Color parameter? Well, let's get to it then…

 5 — CREATING (AND TWEAKING) SHADING COMPONENTS

The Delux shading model is powerful because different surface charateristics (called shading components) can be added to the base Delux model. These additional components can be: specular, rim light, subsurface scattering, 
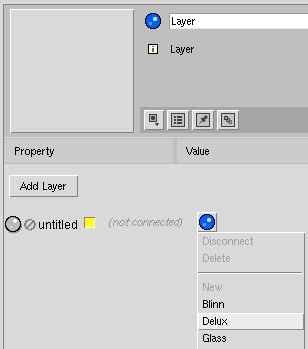
etc. Back in our Layer shader, open up the Delux layer and we'll throw in a couple of components.

  1. First add a shading component by clicking on the “+”.
  2. Next, select the component selector,, and choose Rim. This adds rim lighting control to the Delux. You can view the parameters by clicking on the triangle next to the V2 label.
  3. Create a second component, as shown above, and choose a Specular component.

Now our once diffuse model has specular highlights and rim lighting built directly into it!

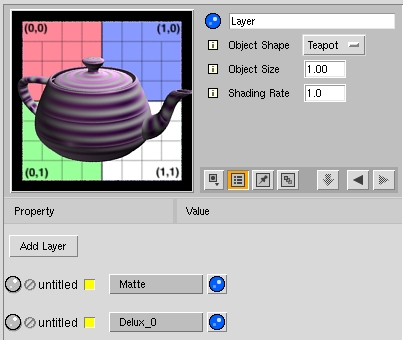
Now, that little Diffuse color tweak…

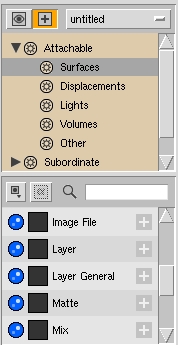
You have oodles of subordinate nodes to choose from when it comes to building Slim appearances. You can manipulate your shader's parameters by attaching a variety of texture maps, patterns (like noise, or fractals), or functions (including an SL Box, to insert raw shading language into your network). For our simple exercise, we're going to map a spline to the color parameter of our Delux's Diffuse component.

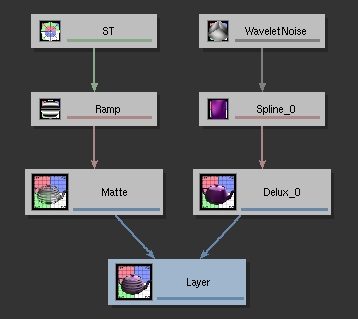
Click on the connection widget to the right of the Color parameter and select Pattern-> Spline. You'll notice that the connection appears in the Graph View, as well. Once again, you can click on the Spline in either view to bring it into focus in the Appearance View.

There are two important bits of the Spline pattern, as you'll notice. There's a Pattern, again, and a Spline Color. You can add additional control points to the spline by clicking within the gradient, and you can bring up the Color Picker by clicking on the round widget to the left of the gradient. Control points can be deleted by clicking on the square box to the gradient's right. Let's bring up the Color Picker and make our Spline a nice progression of pleasant shades of Purple, with a touch of Mauve or…something…

Now, if you click on the Pattern component of our Spline, you might notice something interesting: back when we clicked on the connection widget for the Color parameter, there were a slew of options, in terms of what we could connect to, but now our options are considerably fewer; Slim is smart enough to cull the inappropriate connections. Why don't we select Pattern-> (Random Tiler - Worley)-> Wavelet Noise?

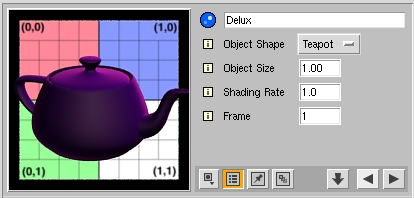
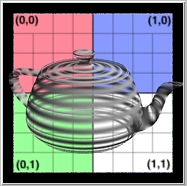
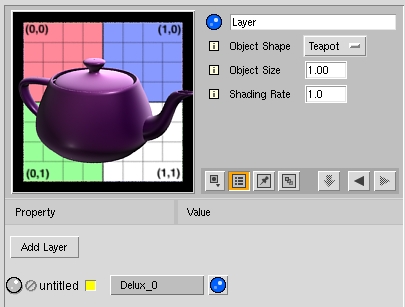
All that being done, let's go back up to the top level of our network and click on the Preview Swatch to compile our shader. Chances are good it will look at least a little bit like the picture just to the left of this text.

Now, that being all well and good, time to add another layer…

 5 — MORE LAYERS, PLEASE!

Okay, lets create some kind of funky, stripey mask to layer on top of our wavy swatch of purple and mauve. This is pretty simple, so we'll go through it fairly quickly…

  1. In our Layer, click on the Add Layer button again.
  2. For simplicity's sake, select a Matte appearance. This should not be confused with a Matte Object.
  3. Click on the Matte appearance to bring it into a focus, then connect a Ramp to the Opacity parameter: Pattern-> Ramp.
  4. Change the RampType to a T Ramp and enable tiling by clicking on the Tile checkbox.
  5. Make the Ramp a series of alternating black and white stripes (completely transparent vs. completely opaque) and select an ST manifold. The manifold controls how a layer or function is mapped on the object in 3D space. (ST mapping is similar to UV mapping in Maya; note that there are a slew of manifold options, including a MayaPlace2d manifold.)
  6. Click on the ST node and change the T Repeats to 2, either with the slider, or by entering the number 2 in the appropriate space.
  7. Navigate your way back up to the Matte node and click on the swatch to compile the shader. It should bear an uncanny resemblance to the image at right.

Now let's jump back up to the Layer node and click on the swatch to compile the whole shebang. What we get is, as you might have guessed by now, our Matte appearance layered on top of our Delux, which we can see clearly through the transparent bits of the Matte.

One more nice thing that you can do with layers: you can move them around. Click on the pretty, round widget to the left and you can drag a layer such that it is oriented on top of or under any other layer.

In this particular case, changing the order wouldn't make much sense, given that the Delux is completely opaque, but you can try it anyway, if you want…

 6 — CONCLUSION

Well, that's that. We've built ourselves a nice little Slim shader. See that picture over there →?
That's what our final Layer appearance should look like in the Graph View.

All that's left now is to select Add to Scene from the Appearance menu. Note that you can retain control within the Maya UI over any given parameter in your nodes by clicking on its connection widget and setting it to use an External Value. What's more, you can bring it all back into Slim after you've added your appearance to your scene simply by clicking on the Edit in Slim button in the Appearance Editor.

This tight integration between Slim and Maya offers you unprecedented flexibility as well as a simple way to expand your shading palette using appearances from Slim along with materials from Maya.

Please be sure to check out the Slim Documentation for more information, including template construction, Slim scripting, and more.


Prev | Next


Pixar Animation Studios
Copyright© Pixar. All rights reserved.
Pixar® and RenderMan® are registered trademarks of Pixar.
All other trademarks are the properties of their respective holders.