Subdivision Surfaces
Subdivision Surfaces
Subdivision Surfaces
Creating, Modeling, and Texturing
What are Subdivision Surfaces?
The subdivision surface is distinctly different from either NURBS or polygons.
Subdivision surfaces combine many strengths of both surface types. For more info about the details of a
subdivision surface, see the PRMan application note: Using the Subdivision Mesh Primitive.
You'll find that MTOR supports two implementations of subdivision surfaces: MTOR subdivisions and Maya subdivisions. Each implementation offers their own tools for working with subdivision surface, but regardless of which is used the final image will basically be the same, since both will be rendered by PRMan as high quality Catmull-Clark subdivision surfaces. So when modeling and texturing subdivision surfaces, you have two alternatives.
First, MTOR provides its own subdivision tools, which are completely integrated with PRMan. Alternatively, MTOR provides direct support for Maya subdivision surfaces, as provided in Maya Unlimited, but there are some limitations imposed upon them (MTOR does not support hierarchical modeling). The best policy is to use MTOR subdivision surfaces when possible, unless Maya's subdivisions are required for a special purpose. The two implementations are not directly compatible, which means you should decide which is best for you before traveling to far down one workpath.
Subdivision Surface Translation |
||
| Implementation | Pro's | Con's |
| MTOR Subdiv Tools |
|
|
| Maya Subdiv Tools |
|
|
In any case, you should be familiar with the workflow for both MTOR Subdivision Surfaces and Maya Subdivision Surfaces.
Maya subdivision surfaces are the recommended way of working with subdivision surfaces in Maya. MTOR provides nearly full support for Maya hierarchical subdivision surfaces (see limitations below). Maya subdivs have a number of advantages over MTOR's subdivision tools, mainly because Maya's subdivisions can fully interact with a scene, which is especially helpful for dynamic effects and simulations.
| Maya Subdiv Limitations with MTOR | |
| Limitation | Workarounds |
|
Use full creases instead, or add geometry to build up a crease. Partial creases relies upon hierarchical modeling. |
Use Maya's subdivision tools for creating and modeling subdivisions. MTOR will translate the rest.
The MTOR subdivision tools can convert any polygonal mesh into a subdivision surface. The idea is to model with Maya's rich assortment of polygon modeling tools. MTOR provides the tools to allow you to convert polygons to subdivision surfaces and to tag polygon components with subdivision surface attributes which govern crease and corner hardness in your model. MTOR Subdivision surfaces are only understood by MTOR, not Maya.
The MTOR subdivision surface tools are available in the RenderMan menu…
The MTOR Subdivision Surface Menus |
Mesh as Subdiv— Converts a polygon to a MTOR subdivision surface. Toggle Object X-ray— Causes the polygonal mesh defining the subdivision surface to become transparent (this occurs when a poly model is converted to a MTOR subdiv.), so the underlying subdivision surface can be seen. If the polygonal mesh is already in X-ray mode, it will toggle back. (When reopening Maya scenes you may need to toggle object x-ray to view the underlying subdiv mesh again.) Add Crease— Edges of a polygonal mesh can be selected and then be given a crease value between 0 and 20. A setting of 0 produces no crease. 20 is a sharp crease. Add Corners— CVs can also be picked and given a "pointy" value, between 0 and 20. Add Holes— Faces can be set as invisible "holes" via this setting, if for some reason you don't want to just delete them. Create Shading Set— This technique of attaching multiple shaders to a subdivision surface is far inferior to the new preferable method of attaching shaders to shading groups. Don't use this; use the shading group technique instead -- if you know what's good for you. |
You can convert a polygon to a subdivision surface at any point during the
modeling process. A MTOR subdivision surface can be just as easily edited as a
polygon model. The choice of when to convert the model is up to you. Next we'll
outline the workflow of converting a simple polygon model. We converted the
following polygon with: RenderMan-> Pixar Subdivs->Mesh as
Subdiv
| Converting a Polygon to a MTOR Subdivision Surface | |
|
|
|
|
Note that MTOR has converted the representation of the original poly mesh to X-Ray mode and has drawn an approximation of the subdivision surface as non-x-ray polygons. Now you can see both the polymesh and the resulting surface simultaneously. So you can continue to model by editing the original polygon mesh. This means that you can move edges or vertices and view the resulting surface interactively. |
|
When you issue the Pixar Subdivs->Mesh as Subdiv command, special attributes are attached to the new MTOR subdiv. When you create a subdiv default settings are used, but you can control these attributes via a standard Maya option box, shown below. You can modify these attributes through either the standard Maya Channel box or via the Attribute Editor. We'll explore what these attributes do now.
| MTOR Subdivision Attributes | |
|
|
|
 mtorSubdiv—
Renders as a subdivision surface when enabled. mtorSubdiv—
Renders as a subdivision surface when enabled.
mtorSubdivExtrap— Controls whether extrapolation occurs for disjoint subdivision meshes, when the subdivision surface is decomposed into several independent primitives for RenderMan. If mtorSubdivExtrap is enabled MTOR will analyze the topology of the mesh and for each shading group will output extra adjacent facets during this decomposition, in order to try to ensure proper continuity of the entire subdivision mesh across the disjoint primitives. mtorSubdivInterp— Controls the interpolate boundary tag for the subdivision surface. mtorSubdivIgnoreEdges— Ignores standard Maya edge hardness attributes, when enabled, as controlled by: Polygons->Edges->Soften/Harden.
drawingEnabled—
Causes to MTOR subdivision surface to display in Maya. When the detail isn't
needed, disabling the redraw will speed up interactive mode. This setting has no
effect on rendering itself, just interactive display. |
|
| Decreasing the Subdiv Steps can increase interactive speed . . . | |
|
|
|
Attributes and the Dependency Graph
The one thing you must keep in mind, however, is where to find the
attributes. The rule of thumb: attributes are located at the point in the
dependency graph where they have the most relevance. In particular, attributes
which control how the subdivision surface is approximated and drawn are located
on the node responsible for drawing them: mtorSubdivNode. Attributes that are
logically associated with the polygon mesh: how to render, which tags, etc. are
associated with the polygon mesh shape node. Other tags, as we'll see
below are controlled via the Maya set whose members are the individual
polymesh components (edges, vertices or facets) which share the crease, corner
or hole attribute.
Here's a fragment of the hypergraph for our scene:
Notice that the sole input into mtorSubdivNode1 comes from pTorusShape1. This connection represents the polygon mesh data. If you wish to modify visualization controls, you should select the mtorSubdivNode1 node and then either turn your attention to the Maya Channel box or invoke the Attribute Editor window.
Subdivision surfaces are very powerful geometric primitives because you can represent arbitrary topologies with relatively few points. All of Maya's polygon tools can be used to model MTOR subdivision surfaces, and that makes working with them pretty straight forward.
One of the nice features of subdivisions is the ability to crease corners and points, which allows you to shape the model without changing the underlying geometry. MTOR does have a few tools of it's own for creating creases and points, at varying degrees of intensity. Where NURBS demand additional geometry to create a crease, creases can simply by added to subdivision surfaces. We'll outline the use of MTOR's tools here . . .
Adding Creases |
|
|
|
|
|
|
|
|
|
|
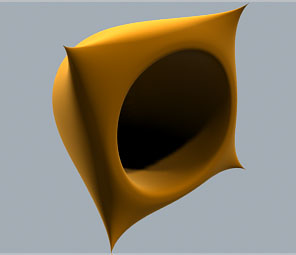
Adding Corners |
|
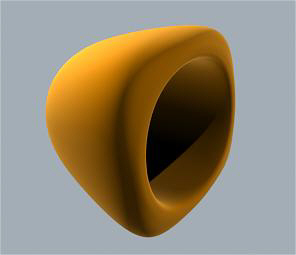
 Corners
can be added by selecting a few polygon CV's and applying corner hardness to
them from MTOR's subdivision menu. On the right you can see the corner option
box. It allows you to add degrees of corner hardness, from 0 to 20. Here are a
few examples of corner hardness, applied to the four CVs on the outside
rim. Corners
can be added by selecting a few polygon CV's and applying corner hardness to
them from MTOR's subdivision menu. On the right you can see the corner option
box. It allows you to add degrees of corner hardness, from 0 to 20. Here are a
few examples of corner hardness, applied to the four CVs on the outside
rim.
|
|
|
|
|
|
|
|
The Crease and Corner Attribute
MTOR attaches an attribute to control the intensity of a crease or a corner. You can
edit this attribute, mtorSubdivCrease
by selecting the mtorCrease node in the hypergraph and, again, either
referring to the Channel box or raising the Attribute Editor window.
With all of these creases and corners it can get pretty
complicated trying to keep track of them. MTOR tries to help out the matter by
creating a new Maya set with every Add Crease and Add Corner command
(as well as Add Hole). You can you these sets to select and reselect
groups of poly edges and CVs.
 We've implemented corner, crease and hole support through the use of
standard Maya sets in order to gain the benefits of the Maya
Set Editor Window. Through the use of this window's
functions, it's reasonably easy to modify the membership
of a set. For example, let's say you've added a crease tag
to your mesh. The edges that were selected at the time you
invoked the Add Crease command are automatically added to
the newly minted set whose name is some variant of mtorCrease.
You can use the set editor window to re-select the edges in
a single operation. You can also remove edges from the set
or add the currently selected edges to any set. This leads
us to suggest the following modeling strategy:
create sets which are logical entities in your model.
Even if you plan to associate the same crease strength
to multiple logical entities in your model, there is added
benefit to being able to select and manipulate the sets
independently.
We've implemented corner, crease and hole support through the use of
standard Maya sets in order to gain the benefits of the Maya
Set Editor Window. Through the use of this window's
functions, it's reasonably easy to modify the membership
of a set. For example, let's say you've added a crease tag
to your mesh. The edges that were selected at the time you
invoked the Add Crease command are automatically added to
the newly minted set whose name is some variant of mtorCrease.
You can use the set editor window to re-select the edges in
a single operation. You can also remove edges from the set
or add the currently selected edges to any set. This leads
us to suggest the following modeling strategy:
create sets which are logical entities in your model.
Even if you plan to associate the same crease strength
to multiple logical entities in your model, there is added
benefit to being able to select and manipulate the sets
independently. |
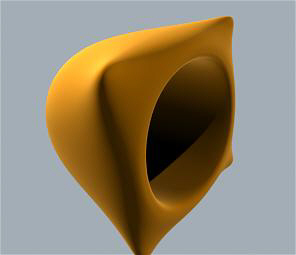
This is a simple example a subdiv model. Here we've started with the little model from above. By using straight forward polygonal modeling operations, we add complexity to our model where it needs it. Mainly notice that it certain areas, like the "cups" of the object there isn't a need for a lot of geometry. The geometry is put where it's needed for details. In the best case, a well modeled subdiv is constructed with the underlying structure of the rigging required for animation, so the strategically placed geometry can function somewhat like a Maya lattice.
 |
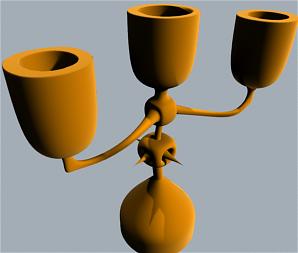 |
| Our Maya model from above, pushed, pulled, extruded and tweaked. | With the addition of creases and corners, a few CVs define a complex topology. |
Shading MTOR subdivision surfaces is really no different than working with their cousin, the polygonal mesh. The standard approaches from the polygonal world are valid. All of the shading and texturing techniques outlined in Shader Concepts apply equally well to subdivision surfaces.
UV Editing — This is the easiest way of texturing subdivs, by taking advantage of Maya's UV Texture Editor and the rest of Maya's polygonal texturing tools. MTOR subdivision surfaces provide full support for Maya's UV Texture Editor, including support for 3D paint (Here's the 3D Paint Tutorial). When working with textures on subdivs, you'll want to edit the UVs on the underlying polygonal mesh that defines the subdiv. You'll want to connect a ST Manifold to your Slim shading network to map textures and shaders to the UVs of your subdiv. If you create a Maya shader to help visualize the texture in Hardware Texturing mode, the texture will be displayed on the polygonal surface.
Surface Parameterization — While generally not preferred, occasionally you'll want to apply textures to a subdiv using the surface parameterization, using the ST coordinates across the entire surface. Most subdivs have an arbitrary topology and the notion of ST coordinates stretched across the surface is irrelevant, but some subdivs, like a plane, are in fact good candidates. You'll notice, however, that "pinching" may result when using the subdiv defaults to a plane. If this is observed you can switch from the default subdiv mode, facevarying, by selecting the subdiv and attaching the smooth attribute on a per surface basis: RenderMan-> Attributes-> Maya Subdiv UVs-> Smooth. That will remedy the issue of pinching.
Projection techniques — Can be used to shade and texture subdivision surfaces. All types of projections can be used to map textures and procedural shaders onto objects. MTOR Coordinate Systems can be used to accurately project shaders and textures onto objects. A MTOR Coordinate System can be used to take a picture of the object, and then that picture can be painted in a paint program and projected back onto the object from the same coordinate system.
Typically, you'll assign a single appearance to each subdivision surface and be on your way toward PhotoRealistic nirvana. However, it is occasionally useful attach shaders to groups of faces, assigning different shaders to different portions of a subdiv. Using this method, Maya shaders are assigned to groups of faces, and then Slim shaders are attached to the Shading Groups of these Maya shaders, and not the objects themselves. For optimal results, you'll generally want the attribute, mtorSubdivExtrap, enabled to preserve the mesh curvature. This method also works on normal polygons.
| Applying Shaders to Group of Faces |
|
Here we have two models. One is a MTOR subdivision surface, and the other is a
Maya subdivision surface. This technique works equally well on either. The
workflow is diagrammed below. For further inspection, an example
file of the following scene is located here: /ratdocs/rattutorials/mtor/shading_group_attachment/ shading_group_attachment.ma |
| 1. First, attach Maya shaders to a groups of faces as shown here . . |
|
|
| 2. Attach Slim shaders to the Shading Groups of the Maya shaders thusly . . . |
|
|
This technique generally works well, but you might encounter some cases where the automatic approach fails. Here you might try the older technique utilizing shading sets. This is a chance this baroque technique may prove more successful if the shading group method fails.
|
Pixar Animation Studios
|
 subdivSteps—
Controls the display quality of the subdivision surface within Maya..
Typical useful range: 0-3. Lower subdiv settings will increase the
interactive speed of Maya, but the subdiv will be displayed as a rougher
mesh, which is the trade-off. You'll want to set this according to the
demands of your model and workflow. This will not affect the quality
of the final rendering, only interactive display.
subdivSteps—
Controls the display quality of the subdivision surface within Maya..
Typical useful range: 0-3. Lower subdiv settings will increase the
interactive speed of Maya, but the subdiv will be displayed as a rougher
mesh, which is the trade-off. You'll want to set this according to the
demands of your model and workflow. This will not affect the quality
of the final rendering, only interactive display.
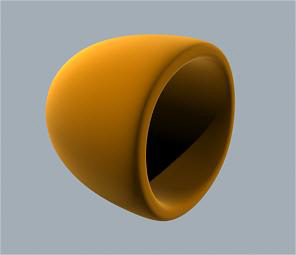
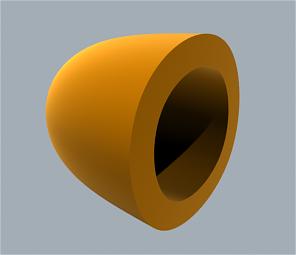
 Creases
can be added by selecting a few edges of your polygon model and applying crease
hardness to them from MTOR's subdivision menu. On the right you can see the
crease option box. Notice that it allows you to add degrees of crease hardness,
anywhere from zero, no crease, to twenty, a full crease. Here are a few examples
of crease hardness, as applied to the inner and outer rim of this object.
Creases
can be added by selecting a few edges of your polygon model and applying crease
hardness to them from MTOR's subdivision menu. On the right you can see the
crease option box. Notice that it allows you to add degrees of crease hardness,
anywhere from zero, no crease, to twenty, a full crease. Here are a few examples
of crease hardness, as applied to the inner and outer rim of this object.