The Slim Window |
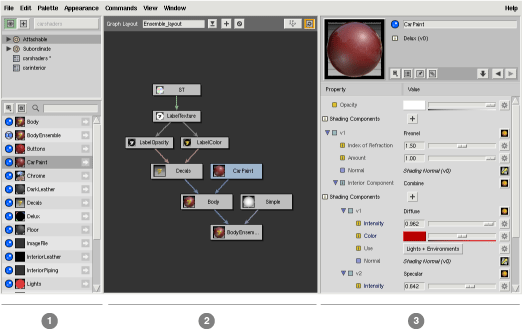
The majority of your operations you perform in Slim will be within one window:

This window is divided into three main sections:
These views all work together to provide increasing levels of detail: The Palette View displays all of your active palettes and their contents. The Network View displays how appearances in those palettes combine to form shaders. The Appearance View displays parameters and a preview for a specific appearance within a network.
These views are window panes, and their relative size can be changed by dragging the mullions (or "sashes") between them. The entire window itself can be resized as well.
Slim can be invoked in different modes. Some of the menu items described below are not always visible, depending on whether Slim is invoked in client or standalone mode, and depending on whether Slim is being used as a piece of RenderMan Artist Tools (RAT) or RenderMan Studio (RMS).
The File menu contains functions related to reading and writing files.
- New Palette
- Create a new palette file and set it as the current palette
- Open Palette
- Open an existing palette file and set it as the current palette
- Save Session (RMS only)
- Save the current session file
- Save Palette
- Save the current palette file
- Save Palette As...
- Save the current palette to a new filename
- Revert Palette...
- Revert the current palette to a previously-saved version
- Remove Palette (when working with a session / scene file)
- Remove the current palette from the existing session / scene file
- Import Appearance...
- Import an appearance or shader from a file
- Export Appearance...
- Export an appearance to a file
- Reload
- Reload the template or shader for the current appearance
- Upgrade Template
- Upgrade the template for the current appearance. This might be necessary if you have loaded a palette with templates from a previous version of Slim.
- Quit (Only when used with RfM or in standalone mode)
- Quit Slim
The Edit menu contains commands related to editing:
- Undo
- Undo the last action performed
- Redo
- Redo the last action undone
- Select All
- Select all appearances in the current palette
- Delete
- Delete the selected appearance(s)
- Revert Values
- Revert all of the parameter values for the selected appearance to their defaults
- Preserve Values
- Freeze all of the current parameter values for the selected appearance. This will protect those values from any changes to the values in the appearance's source.
The Palette menu provides commands that operate on the current palette.
- Create Subpalette
- Create a new subpalette in the current palette. You can drag/drop appearances and other subpalettes into and out of this subpalette.
- Create Smart Palette
- Create a new smart palette within the current palette. This will open the Smart Palette Editor, enabling you to select the criteria for your new smart palette.
- Edit Library Palette
- Edit the contents of a selected Library Palette.
- Close Package
- Close the current package.
- Saved Icon Settings
- Change the settings for saving icons in the current palette: The first set of radio buttons controls which appearances within the palette will have their icons saved. The second set controls the resolution of those icons. Saving icons within a palette increases its file size, which can affect the speed at which the palette is loaded.
- Uniqueify All
- Reassign the unique identifiers for all nodes within the palette. This is necessary after copying a palette file to make sure its identifiers do not conflict with those in the original.
- Delete Unused (only when used with MTOR)
- Delete any appearances that aren't in use by MTOR.
- Delete Disconnected
- Delete any non-attachable appearances that aren't connected to any attachable appearances.
The Edit menu contains commands related to editing:
- Attach (MTOR only)
- Attach the selected appearance to the object picked in Maya
- Detach (MTOR only)
- Detach the selected appearance from the object picked in Maya
- Pick Objects (MTOR only)
- Pick the objects in Maya that have the selected appearance attached
- Pick Objects (Calculated) (MTOR only)
- Pick the objects in Maya that have the selected appearance attached in the current adaptor context
- Add to Scene (RfM only)
- Add the selected shader to the current scene
- Render Icon
- Render the preview swatch for the selected appearance
- Render Flipbook
- Render a flipbook for the current appearance
- Select
- This provides a set of commands allowing you to select instances, upstream or downstream appearances for the selected appearance.
- Duplicate
- Duplicate the selected appearance.
- Duplicate Network
- Duplicate the selected appearance and all upstream appearances.
- Create Instance
- Create an Instance of the selected appearance.
- Create Shader Instance
- Create a Shader Instance of the selected appearance.
- Package
- Enclose the selected appearances in a Package.
- Unpackage
- Extract the contents of the selected package and delete it.
- Show Package Contents
- Show the contents of the selected package.
- Edit Package Parameters
- Edit the Parameter interface for the selected package.
- Edit Master
- This provides a pair of commands that allow you to globalize (give an absolute path to) or localize (give a relative path to) the shader generated by the selected appearance.
The Commands menu lists a set of procedures that can be customized and configured. Information on creating these commands is available in the Scripting documentation.
By default, a few commands are available for the current palette:
- Recompile All
- Recompile all of the shaders in the current palette.
- GenerateReport
- Generate a verbose report providing copious amounts of data. This report enumerates external resources and reports warnings. The report is printed to the Slim Message Logger.
- GenerateReport (Short)
- Generate a short version of the above report enumerating warnings. The report is printed to the Slim Message Logger.
- String Search & Replace
- A general search and replace command. The procedure used by this command is also accessible from the scripting environment using the ::Slim::SearchReplace procedure.
- Instance All
- Instantiate each of the current templates. This can be useful procedure for testing your set of templates.
The View menu controls visibility of various elements in Slim.
- Toggle Palette View
- Toggle the Palette View between Browse and Create mode.
- Show Network View
- Toggle the visibility of the Network View.
- Maximize Network View
- Maximize the Network View by temporarily hiding the Palette View.
- Two-Column View
- Arrange the Slim Window in a Two-Column View.
- Three-Column View
- Arrange the Slim Window in a Three-Column View (the default).
- Show Appearance Notes
- Toggle the visibility of notes within the Appearance View.
- Show Appearance Tags
- Toggle the visibility of tags within the Appearance View.
- SL Source (Only with Expert Menus enabled)
- Display the shading language source for the selected appearance in a text editor.
- Slim Source (Only with Expert Menus enabled)
- Open the Slim source for the selected appearance in a text editor. This is how the appearance will be written into the palette file. Any changes made and saved in the text editor will be incorporated back into the appearance after you close the editor.
The Window menu gives you access to all of the other windows of Slim.
What follows is a list of windows for any appearances that are being edited in a separate window (if any).
- Workspace Editor (RAT only)
- Open the Workspace Editor
- Message Log
- Open the Message Log
- Console
- Open the Slim Scripting console
- Preferences
- Open the Preferences editor
The Help menu contains an About Slim command that displays build and version information as well as links to this documentation and the RenderMan forums.
Because this menu can be customized, you may find additional links to documentation specific to your studio.
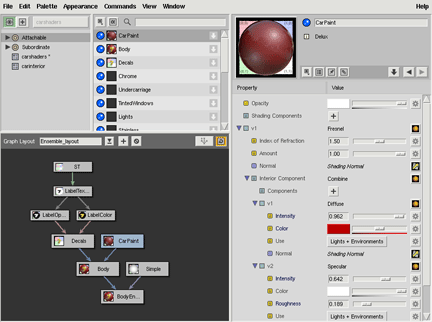
With the Network View visible, the Palette View and Network View can also be arranged in a "Two-Column" View. Depending on your palette, networks, and monitor, you may find this arrangement a better use of space. It can be selected from the View Menu.

|
Pixar Animation Studios
|